Subject Crediting
The Subject Crediting module is used to manage students’ credited subjects. It handles the list of subjects submitted by applicants during their initial evaluation. The subjects shown here are considered the primary list for crediting.
Final approval of which subjects will be officially credited is determined by the Registrar’s Office after reviewing the initial evaluation results.
With this module, you can add, edit, and review credited subjects for each student.
What you can do in this module:
-
Add credited subjects to a student's record.
-
Edit or update details of credited subjects.
-
Remove credited subjects when necessary.
-
View a list of all credited subjects per student.
Required Permission
- Subject Crediting - Allows the user to add, edit and manage students' credited subjects including recording subjects from previous schools or special approvals.
How to Access the Module
To access the module, make sure you have the Subject Crediting permission. If it doesn’t appear in your portal, request access from your System Administrator.
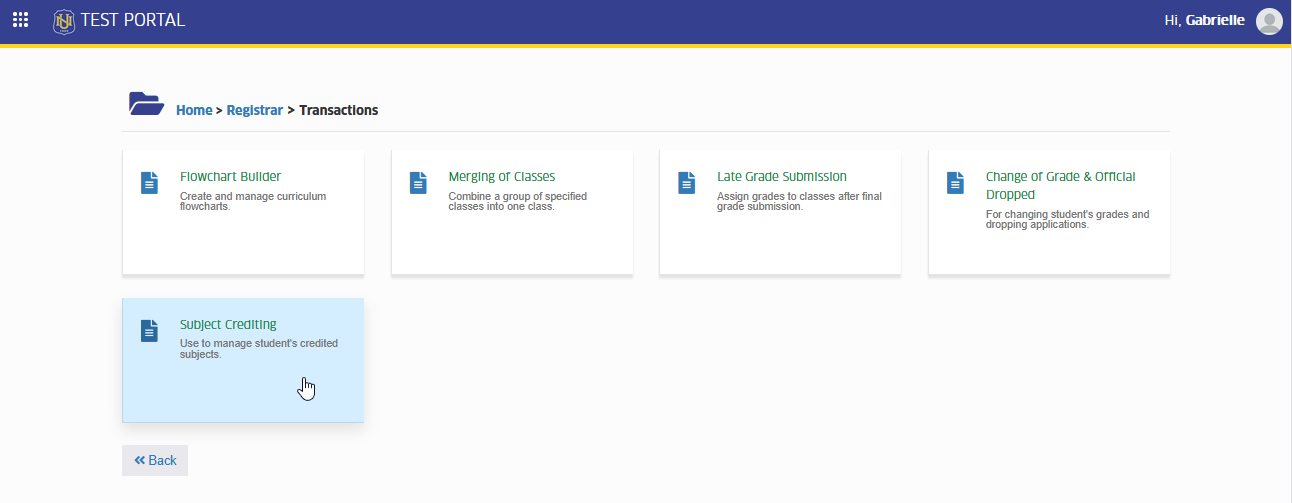
Go to Registrar > Transactions > Subject Crediting. Click the module tab to redirect to Subject Crediting page.
How to Use the Module?
This section guides you through managing students’ credited subjects after their initial evaluation. It covers how to view the primary list of subjects to be credited, add or edit subject details, and prepare the records for the Registrar’s Office to review and finalize.
Adding Credited Subjects
Lets you finalize the list of subjects that will be credited to a student’s record. The initial evaluation results serve only as reference records, while this module is used to determine the official credited subjects.
Follow the instruction below on how to add credited subjects to a students' record.
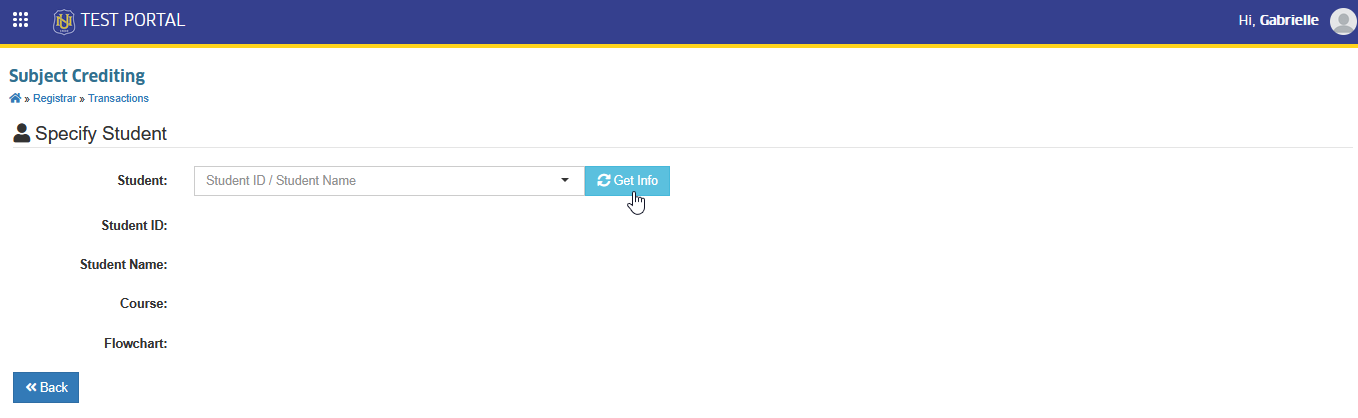
STEP 1. In Subject Crediting page, enter the student's ID and click the button. The student's record will then be displayed.
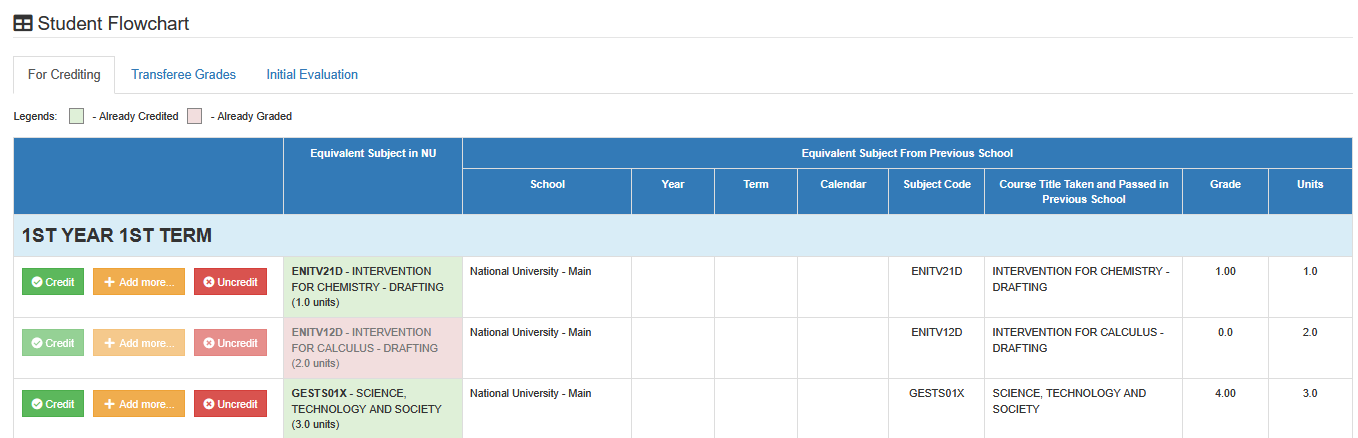
STEP 2. In Subject Crediting page, scroll down to Student Flowchart section. By default, users are in For Crediting tab. All subjects approved for credit during initial evaluation will be displayed from here.
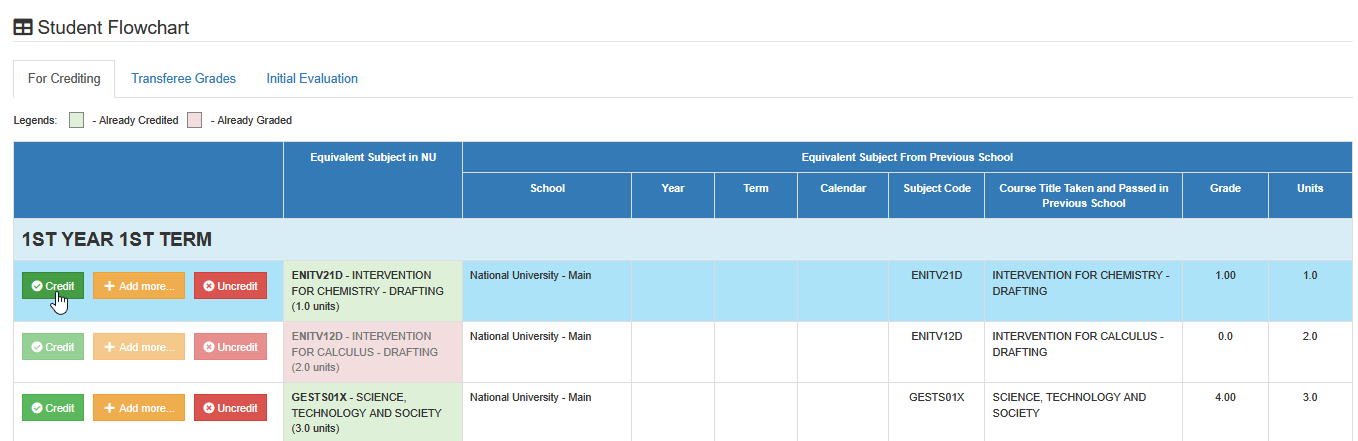
STEP 3. Click the corresponding button for the specific subject you want to credit. The Manage Credited Subject prompt will appear.
STEP 4. Fill out the required fields in the Manage Credited Subject prompt to record the credited subject details.
Manage Credited Subject Required Fields
| Field Name | Discription |
|---|---|
| Equivalent Subject(s) | The matching subject or subjects in the current curriculum that the credited subject will replace or be counted as. |
| School Name | The name of school where the credited subject was originally taken. |
| School Year | Specify the academic year when the credited subject was taken at the originating school. |
| Period | Indicate the term or semester (e.g., 1st Semester, 2nd Trimester, Summer) when the credited subject was taken. |
| Calendar | Select the academic calendar type (e.g., Semester, Trimester, Term) that was used when the credited subject was taken. |
| Subject Code | Enter the official code of the credited subjects as it appears in the originating school's curriculum or records. |
| Subject Name | Enter the full title of the credited subject as listed in the originating school's record or curriculum. |
| Grade | Input the final grade the student received for the credited subject for the originating school. |
| Units | Enter the number of academic units assigned to the credited subject based on the originating school's curriculum. |
| Cross Enrolled | This field is optional. Set to YES only if the course was cross-enrolled by the student to be reflected in transcript. |
STEP 5. Click the button to finalize and credit the subject to the student's record.
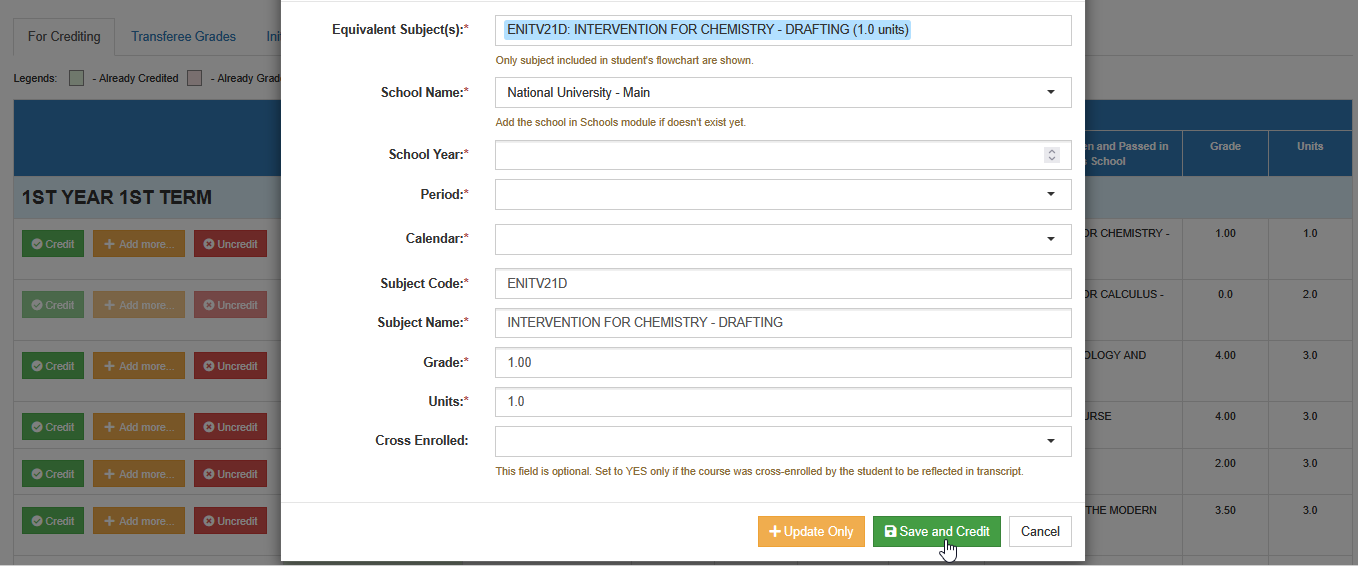
After saving, the credited subject will be stored under the Transferee Grades tab. It will also automatically reflect in the student’s Academic Performance and Student Flowchart.
Add More Entry
This feature is used when two or more subjects from the student’s previous school need to be credited as equivalent to a single subject in the university's curriculum. It allows you to add multiple subject entries under one credited subject record.
STEP 1. In the Subject Crediting page, go to the Student Flowchart section and make sure you are in the For Crediting tab.
STEP 2. Click the button for the subject you want to credit. The Manage Credited Subject prompt will be displayed.
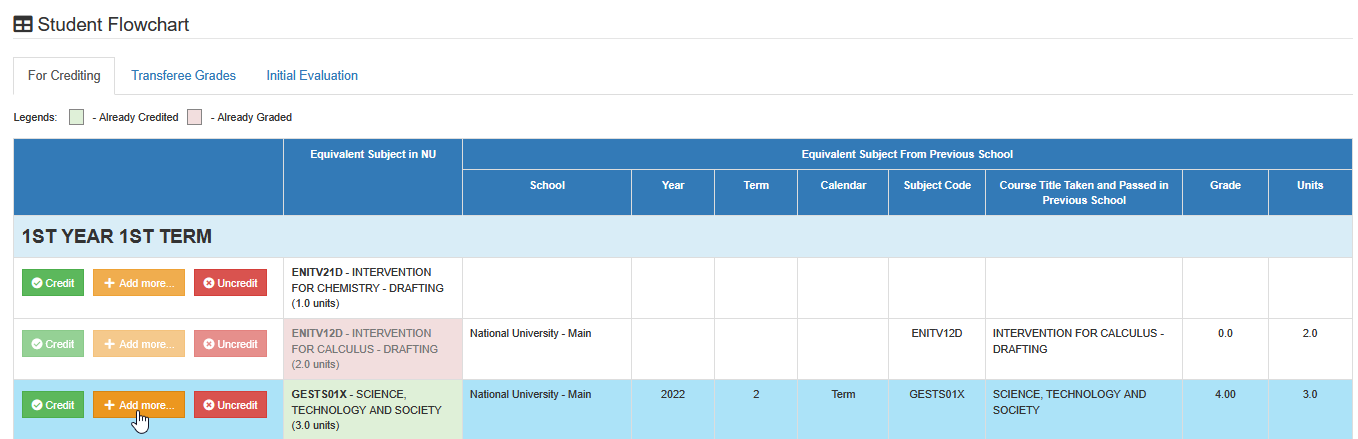
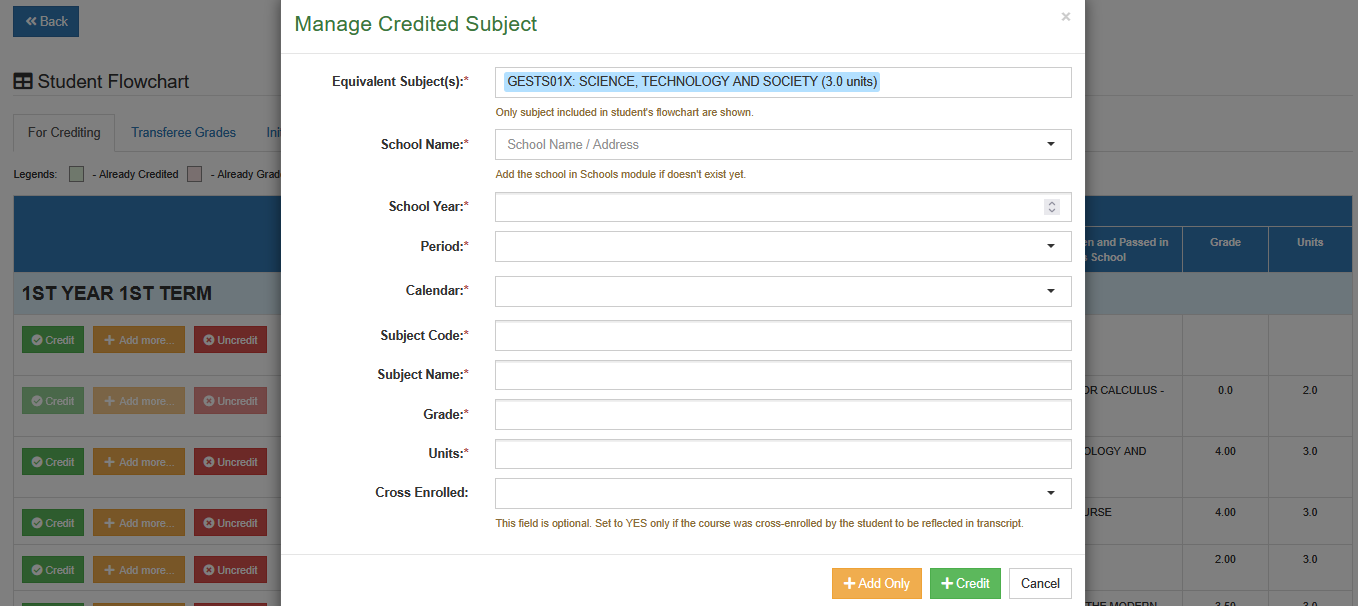
STEP 3. Fill out the required fields for the credited subject.
STEP 4. You have the option to click the button to add another subject entry, or click the button to immediately credit the subject.
Update Credited Subjects
This section is used to edit the details of a subject that has already been credited. Information such as the equivalent subject, grade, units, or other details can be updated to ensure the student’s credited subject record remains accurate and current.
STEP 1. In the Subject Crediting page, go to the Student Flowchart section and make sure you are in the For Crediting tab.
STEP 2. Click the corresponding button of the subject to be edited. The Manage Credited Subject prompt will be displayed.
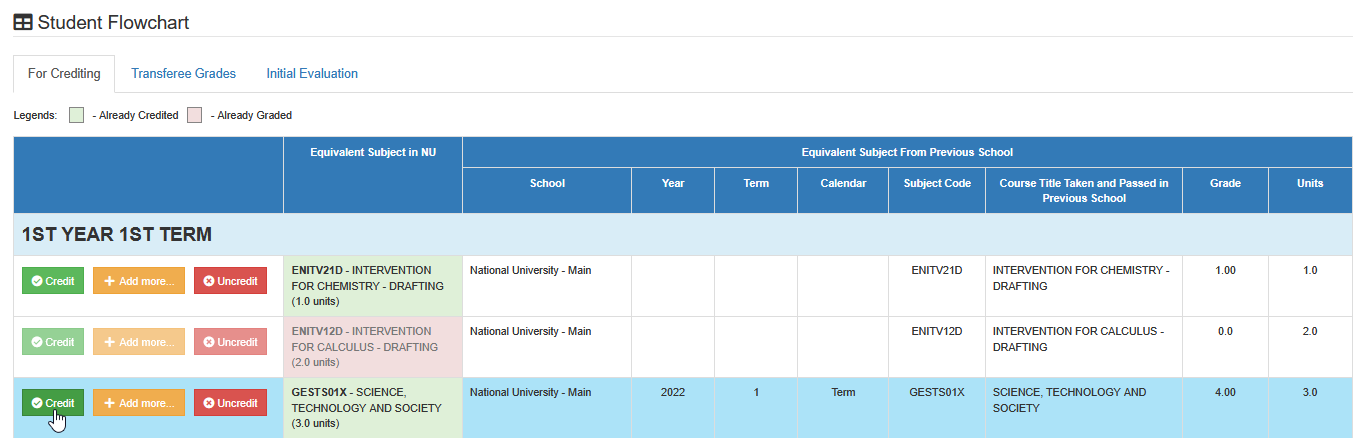
STEP 4. Update the required fields as needed in the Manage Credited Subject prompt.
STEP 5. Click the button to apply the changes.
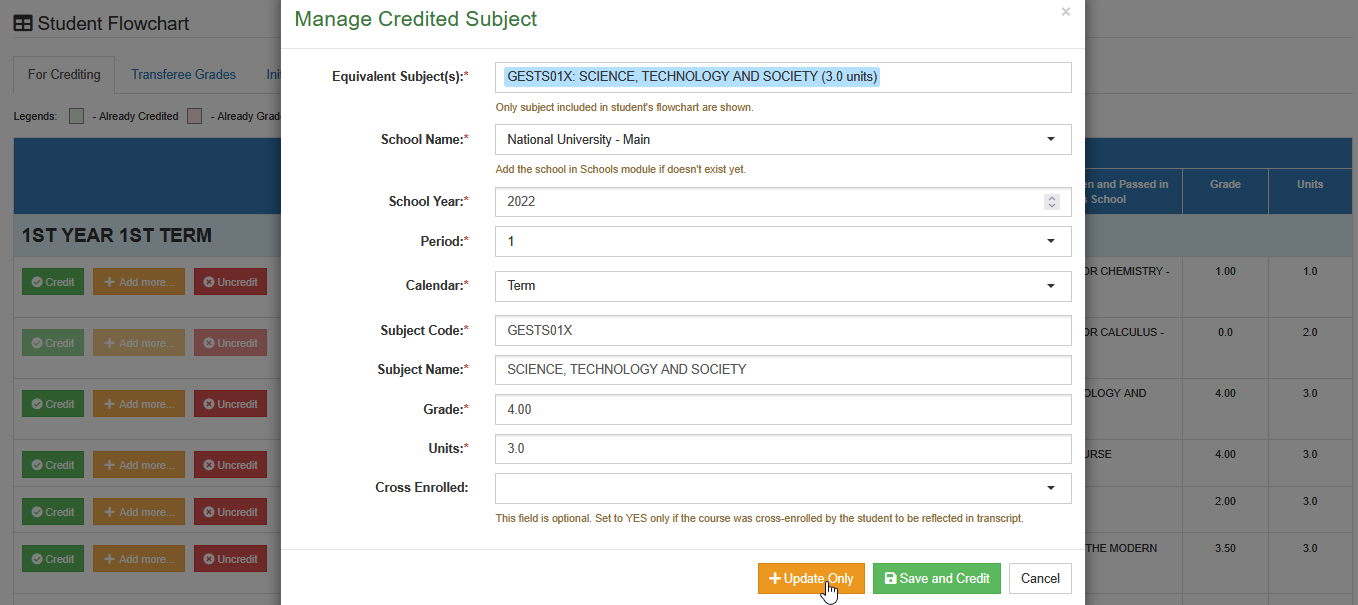
Uncredit Subjects
This section is used to remove a subject that has already been credited to the student's record. When a subject is uncredited, it will no longer appear it student's academic performance or flowchart.
Follow the steps below on how to uncredit a subject.
STEP 1. In the Subject Crediting page, go to the Student Flowchart section and make sure you are in the For Crediting tab.
STEP 2. Find the subject you want to remove and click its corresponding button.
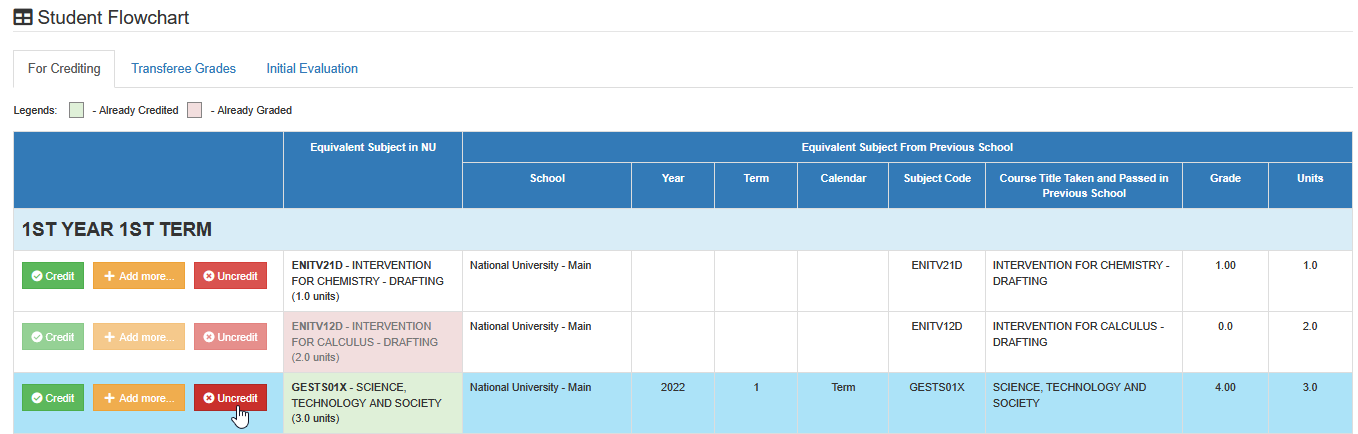
STEP 3. When the confirmation prompt appears, click button to proceed.
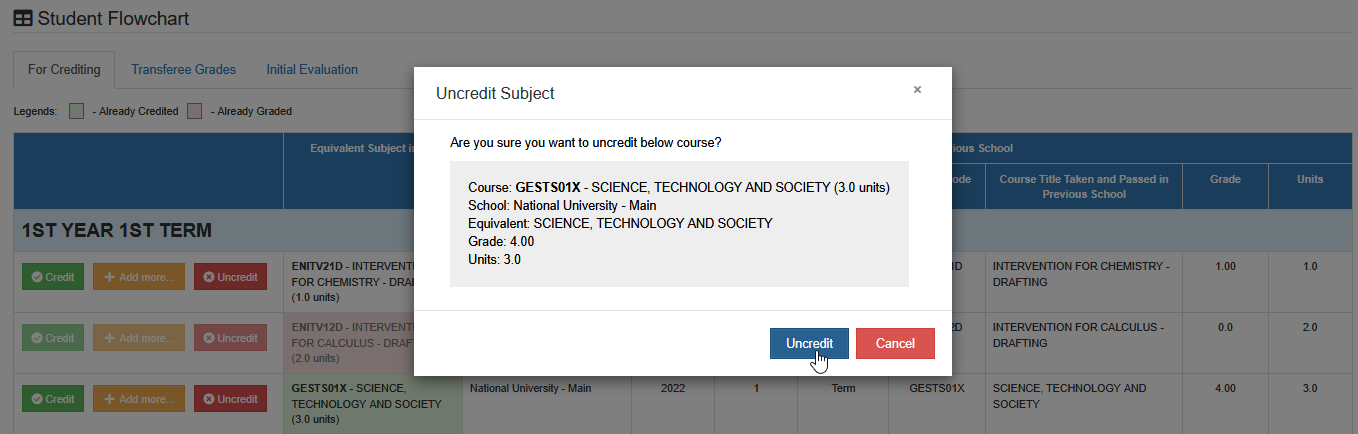
STEP 4. The subject will be uncredited. It will also no longer appear in the student’s Academic Performance and Student Flowchart.
Update Transferee Grades
This section is used to edit the details of a subject recorded in the Transferee Grades tab. Any updates made here will automatically take effect in the student’s Academic Performance records, ensuring consistency across their credited subjects and overall academic record.
Follow the steps below on how to update transferee grades.
STEP 1. In the Subject Crediting page, go to the Student Flowchart section and make sure you are in the Transferee Grades tab.
STEP 2. Find the subject you want to update and click its corresponding button. The Edit Transferee Grade prompt will appear.
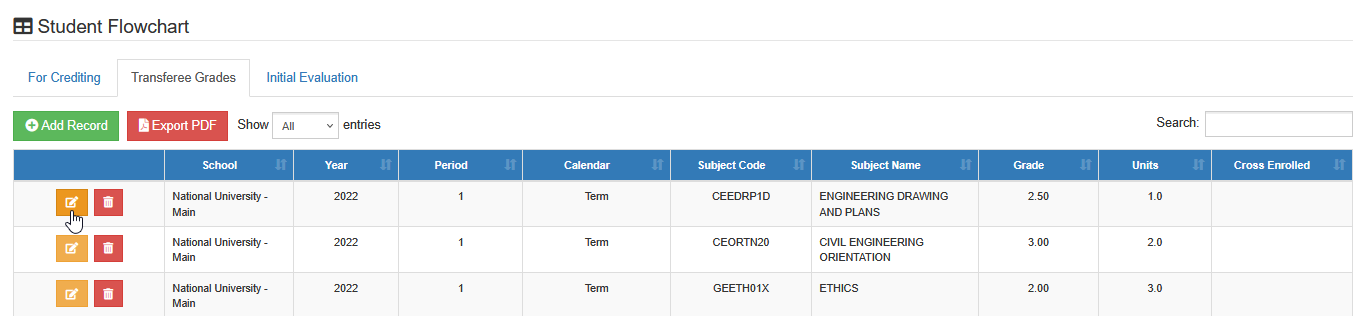
STEP 3. Update the necessary fields such as grade, units, or other details.
STEP 4. Click the button to apply the changes.
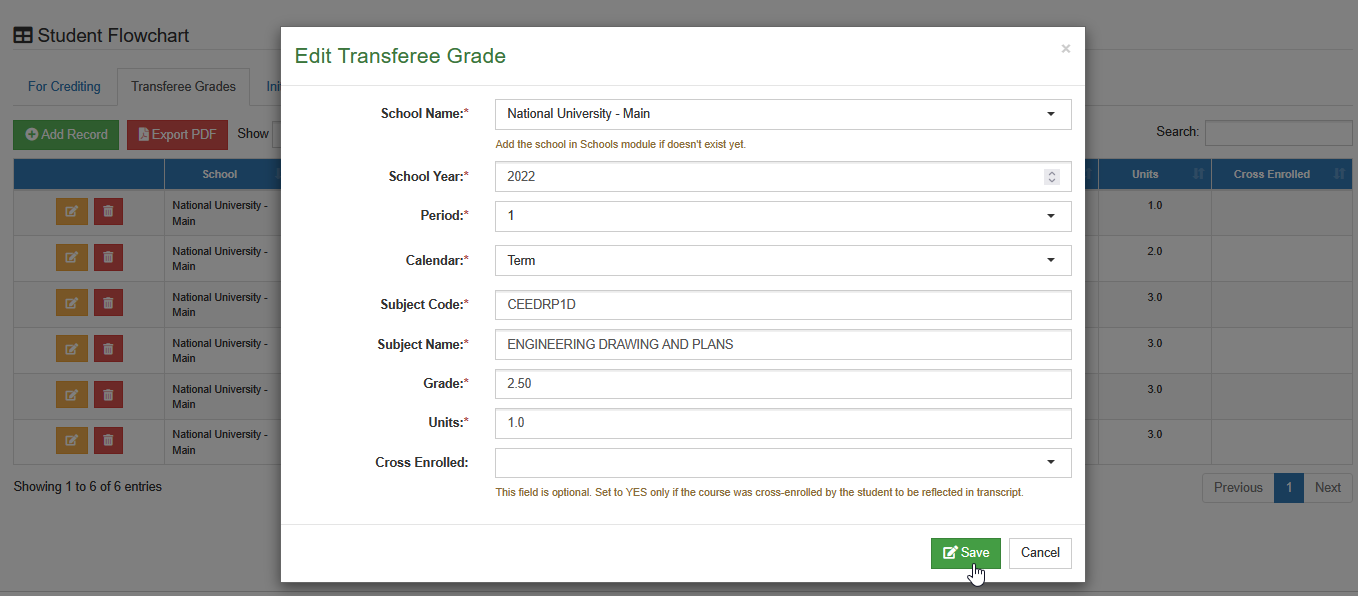
STEP 5. The updated subject details will be saved and will automatically reflect in the student’s Academic Performance records.
Delete Transferee Grades
This section is used to remove a subject from the Transferee Grades tab. Once deleted, the subject will still appear in the student’s Academic Performance, but it will be marked with the remark “Credited but no corresponding transferee grade record.”
Follow the steps below on how to delete transferee grade record.
STEP 1. In Transferee Grades tab, find the subject you want to delete and click its corresponding button. The Remove Transferee Grade prompt will appear.
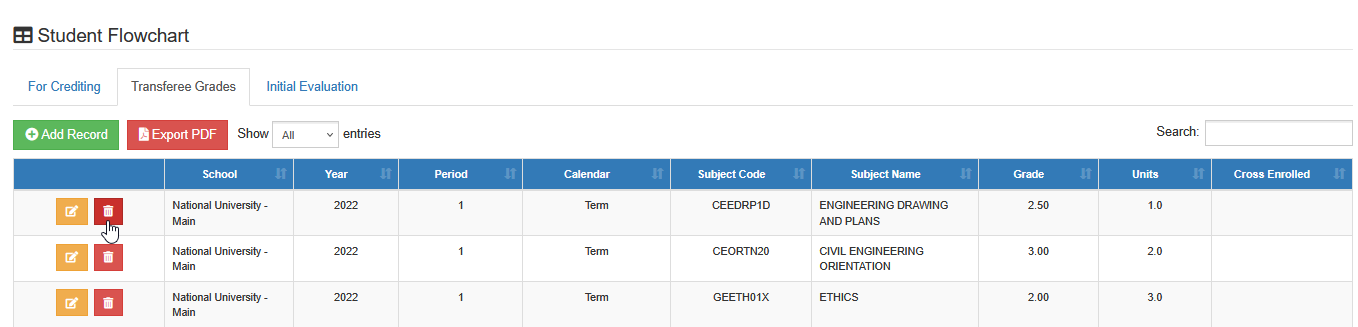
STEP 2. In Remove Transferee Grade prompt, click the button to proceed.
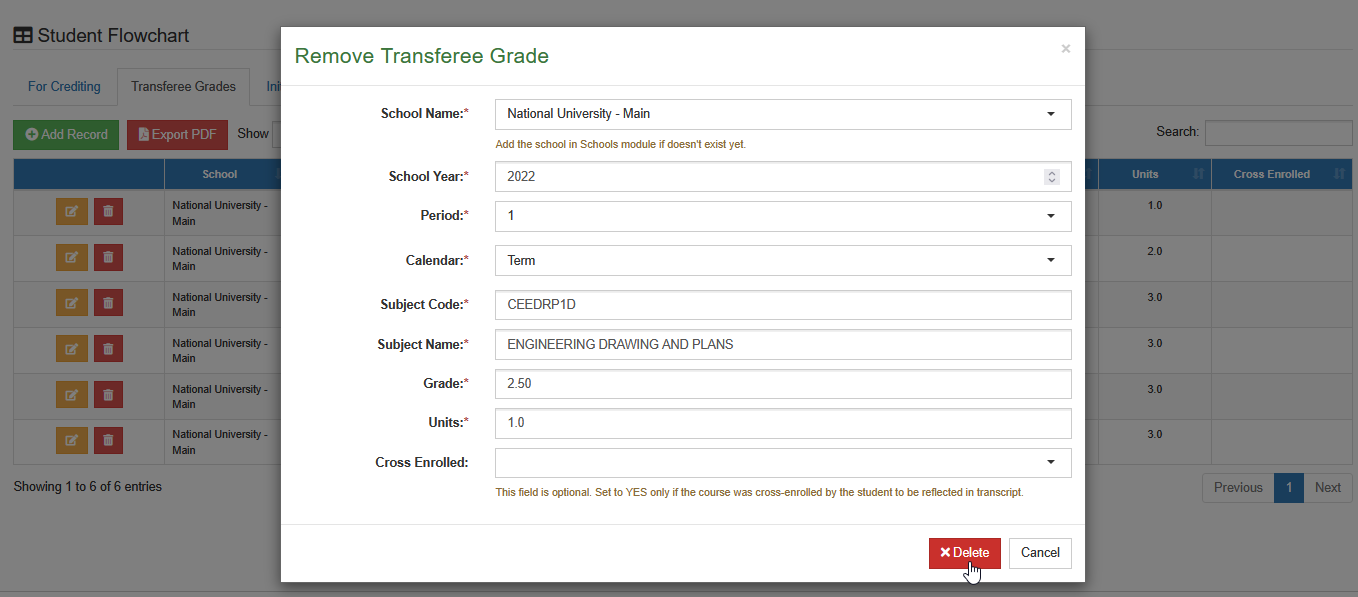
STEP 3. The transferee grade record will be deleted. The subject will still appear in the student’s Academic Performance, but with the remark “Credited but no corresponding transferee grade record.”
Delete Initial Evaluation
This section is used to remove the student’s initial evaluation record. The deletion will not proceed if there is an existing transferee grade record. Once deleted, all encoded data in the For Crediting tab will be permanently removed. This action is irreversible and should be done with caution.
Follow the steps below on how to delete initial evaluation record.
STEP 1. In the Subject Crediting page, scroll down to the Student Flowchart section and open the Initial Evaluation tab.
STEP 2. Click the corresponding button of the record you want to remove.
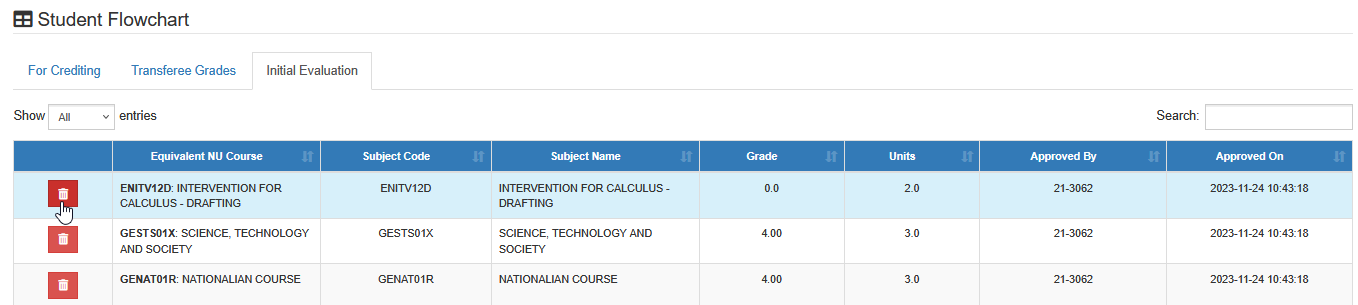
STEP 3. Click the button
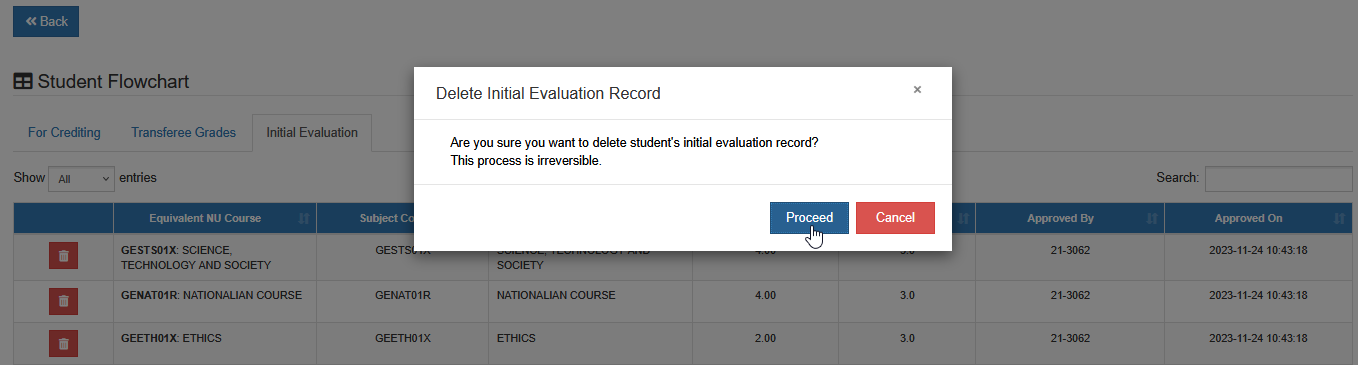
STEP 4. If the student has an existing transferee grade record, the deletion will not proceed and a notification will be displayed.
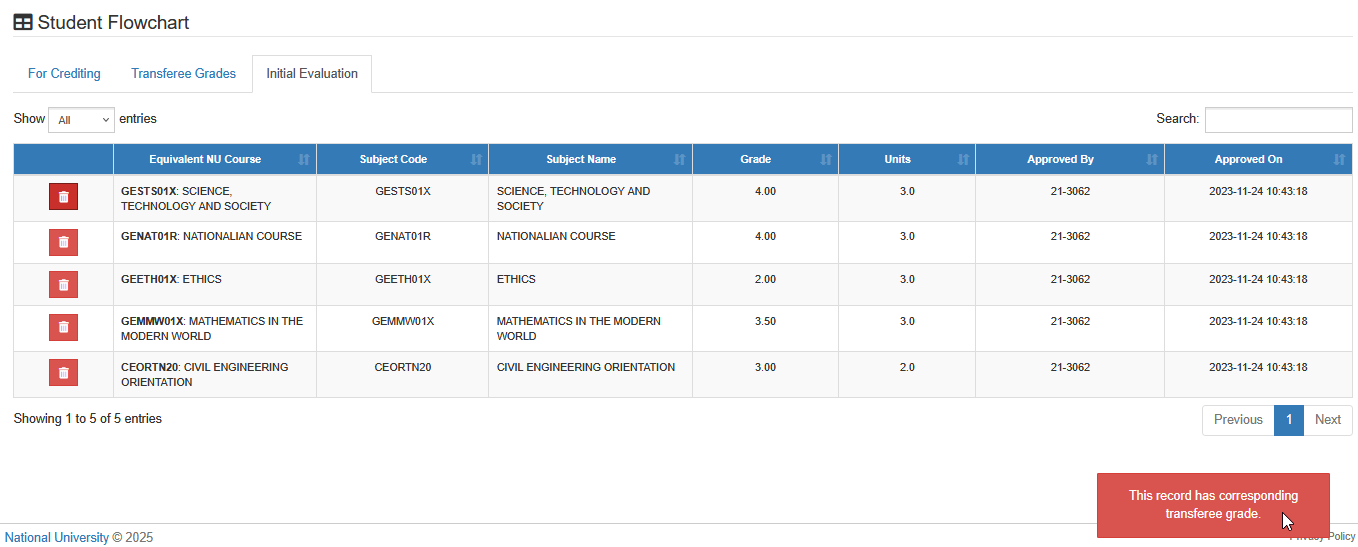
STEP 5. If no transferee grade record exists, the initial evaluation record will be deleted, and all encoded data in the For Crediting tab will be permanently removed. This process cannot be undone. After deleting the initial evaluation, uncredit the subject if there are credited subjects that need to be removed from the student’s record.
For more questions or concerns, email us at nu-desk@national-u.edu.ph