Subjects
The Subjects module is used by the Registrar Personnel to manage all subject information in the system.
This is where you create, update, and maintain the list of subjects offered by the campus. You can also control whether a subject is available for use in class offerings and enrollment.
Required Permission
Add Subject - Allows the user to create and register a new subject record in the system.
Delete Subject - Allows the user to permanently remove a subject record from the system.
Edit Subject - Allows the user to modify or update existing subject information.
View Subject - Allows the user to view and search subject records in the system.
How to Access the Module
To access the module, make sure you have the View Subject permission. If it doesn’t appear in your portal, request access from your System Administrator.
In NUIS portal, go to Registrar > Records Management > Subjects. Click the module tab to redirect to the Manage Subject list view page.
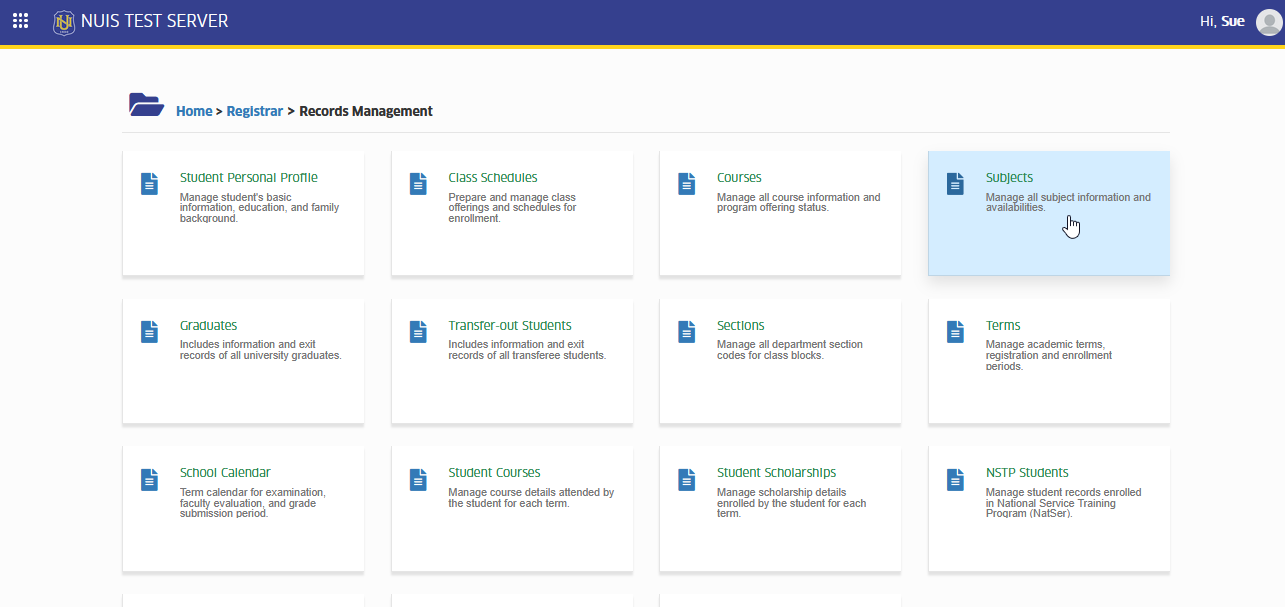
How to Use Subject Module
The Subjects module allows Registrar Personnel to manage all subject records in the system. This includes adding new subjects, updating existing subject information, and removing subjects that are no longer needed.
Through this module, you can ensure that subject details such as codes, descriptions, units, and other academic information are accurate and properly maintained. Keeping subject records updated is important to support class scheduling, enrollment, and academic reporting.
Always review subject information carefully before making changes to avoid duplicates or incorrect entries in the system.
How to Add New Subject Record
Follow the step below to add new subject record.
STEP 1. On the Manage Subject list view page, locate and click the button.
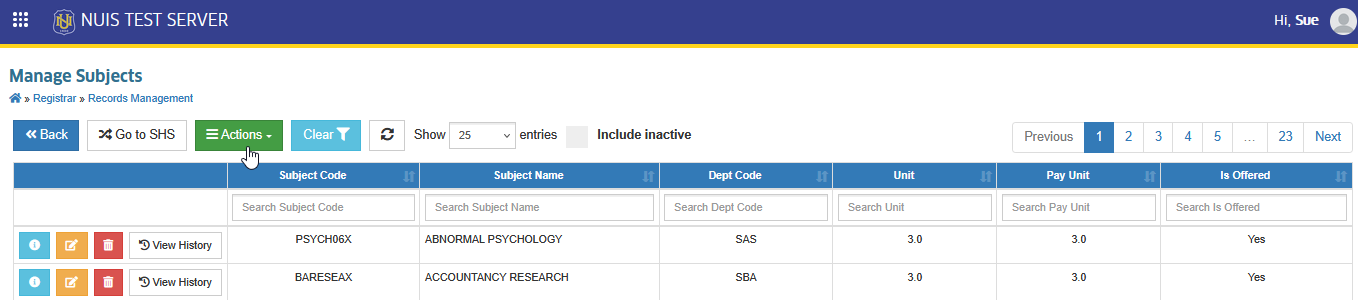
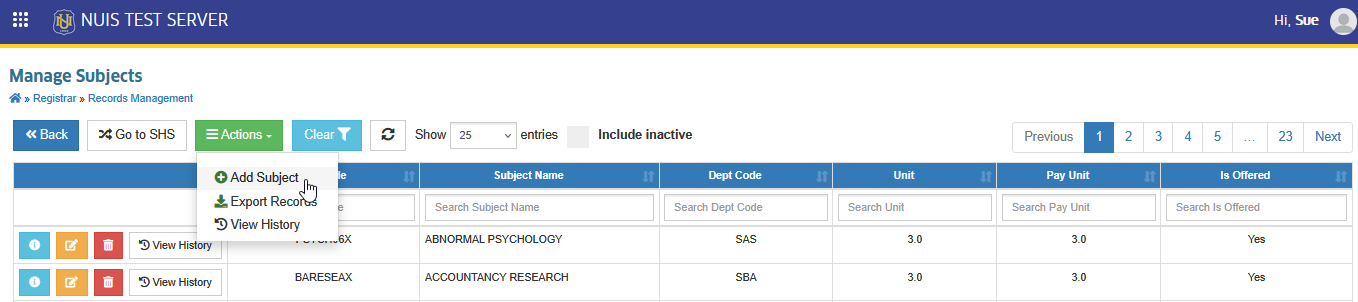
STEP 2. From the dropdown of actions, select and click the option. The system will redirect to Add Subject page.
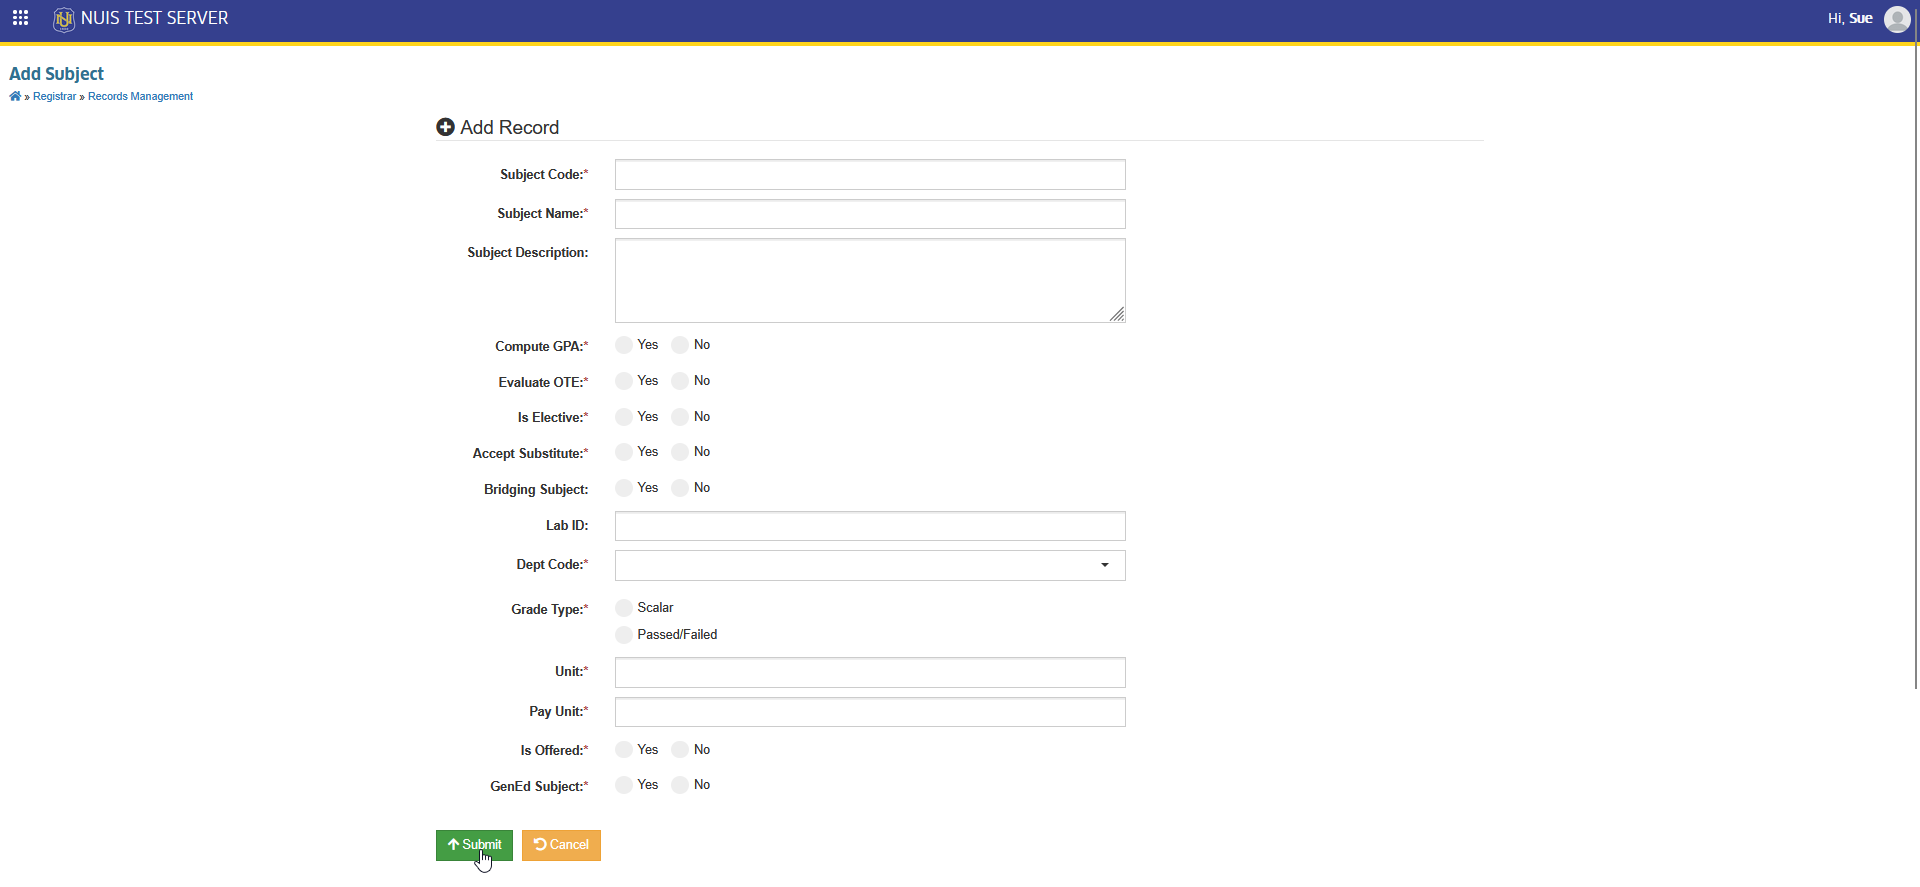
STEP 3. Fill out the required information on the Add Subject page.
| Field Name | Description | Is Required |
|---|---|---|
| Subject Code | The unique code assigned to the subject (e.g., ENG101). This should not be duplicated. | Yes |
| Subject Name | The official name of the subject . | Yes |
| Subject Description | A brief explanation of the subject content or coverage. | No |
| Compute GPA | Select Yes if the subject grade should be included in GPA computation. Select No if it should not affect GPA. | Yes |
| Evaluate OTE | Select Yes if the subject should be included in Online Teacher Evaluation. Select No if it is excluded from evaluation. | Yes |
| Is Elective | Select Yes if the subject is classified as an elective. Select No if it is a required or core subject. | Yes |
| Accept Substitute | Select Yes if the subject can accept substitute subjects. Select No if substitution is not allowed. | Yes |
| Bridging Subject | Select Yes if the subject is intended for bridging or prerequisite completion. Select No if it is a regular subject. | No |
| Lab ID | Optional. Select the corresponding laboratory ID if the subject has a laboratory component. Leave blank if not applicable. | No |
| Dept Code | Select the department that owns or manages the subject from the dropdown list. | Yes |
| Grade Type | Choose the grading format: Scalar (numerical grades) or Pass/Fail. | Yes |
| Unit | The academic credit units assigned to the subject. | Yes |
| Pay Unit | The number of units used for payment computation. This may differ from academic units if applicable. | Yes |
| Is Offered | Select Yes if the subject is available for class offering. Select No if it is not currently offered. | Yes |
| GenEd Subject | Select Yes if the subject is classified as a General Education subject. Select No if it is not part of the GenEd curriculum. | Yes |
STEP 4. Once completed, click the button to submit and save the new record.
Edit Subject Information
STEP 1. On the Managa Subjects list view page, search for the specific subject and click it's corresponding button. The system will redirect to Edit Subject page.
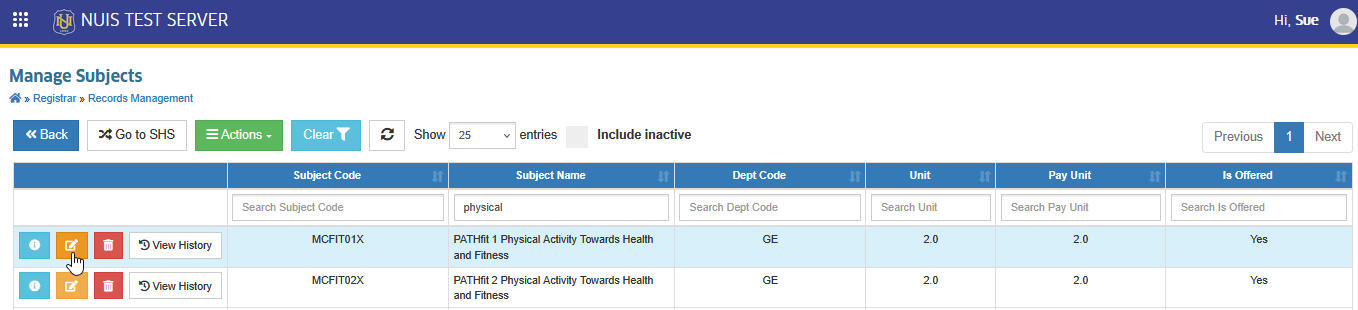
STEP 2. Update the necessary information, then click the button to save the changes.
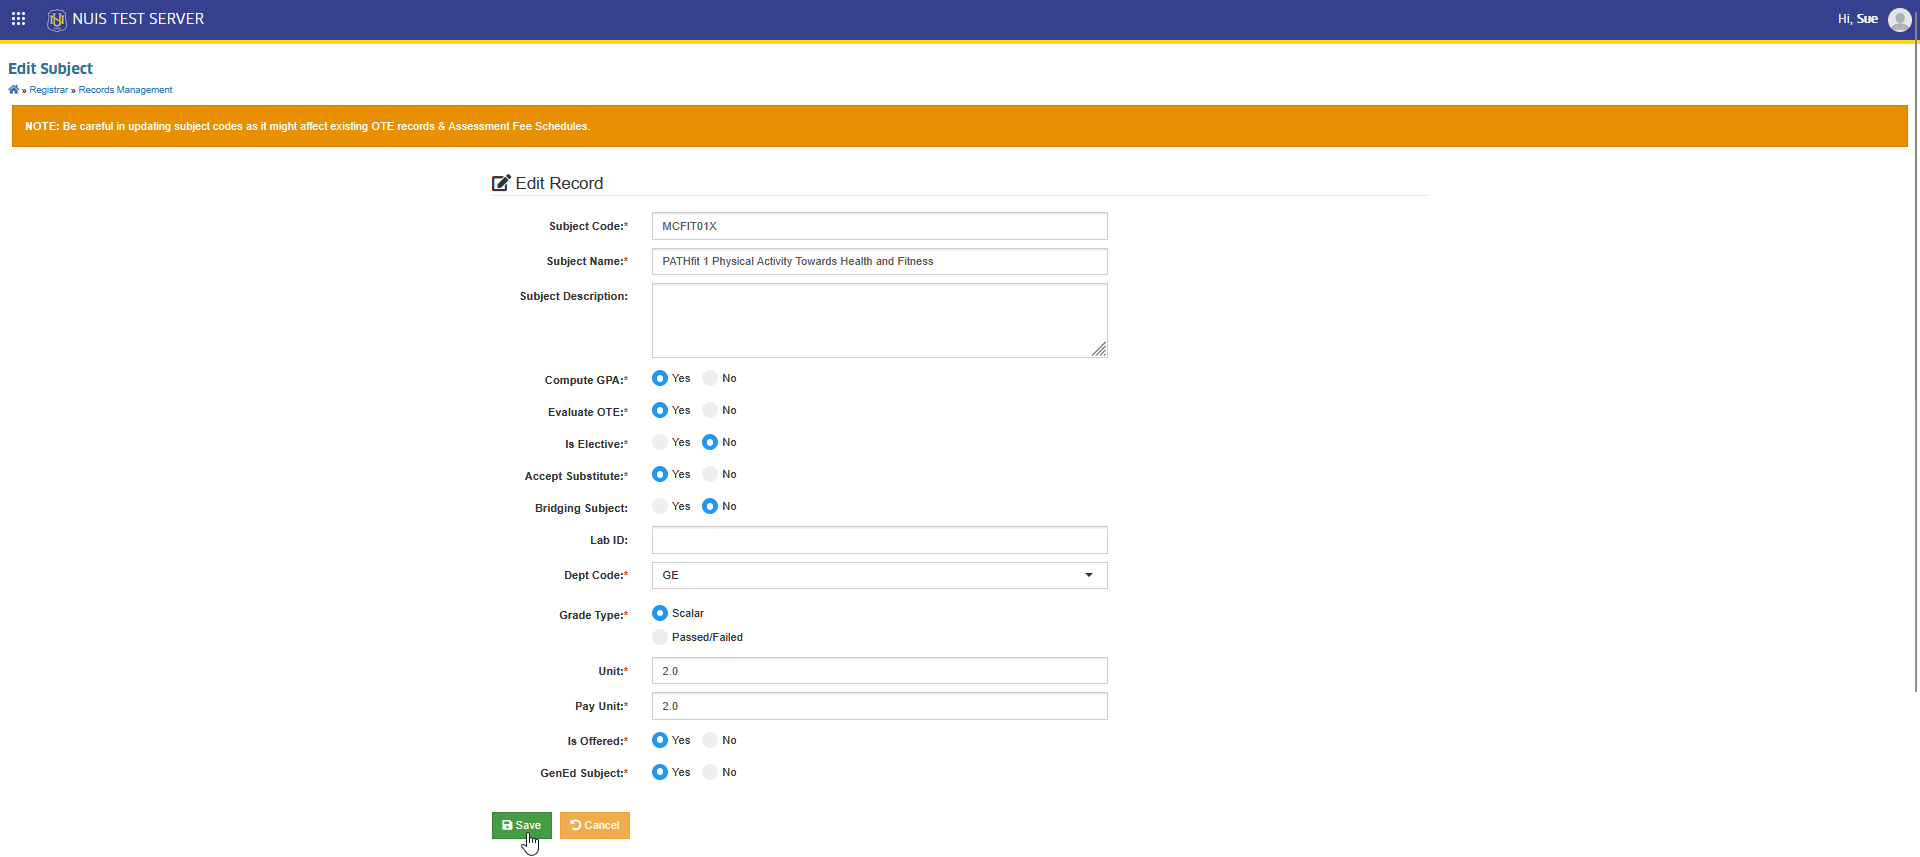
Be careful in updating subject codes as it might affect existing OTE records & Assessment Fee Schedules.
Delete Subject Information
Follow the steps below to delete a subject record.
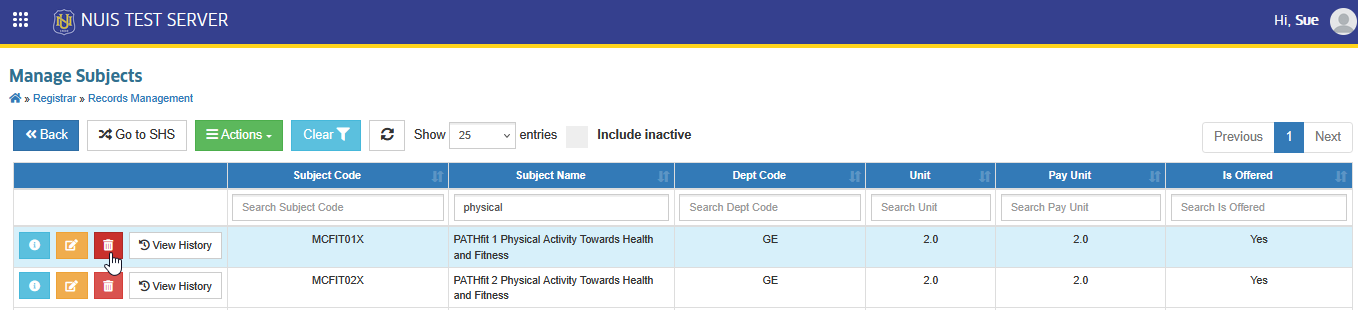
STEP 1. On the Manage Subject list view page, click the corresponding button of the record to be removed. The system will redirect to Delete Subject page.
STEP 2. Confirm the deletion by clicking the button.
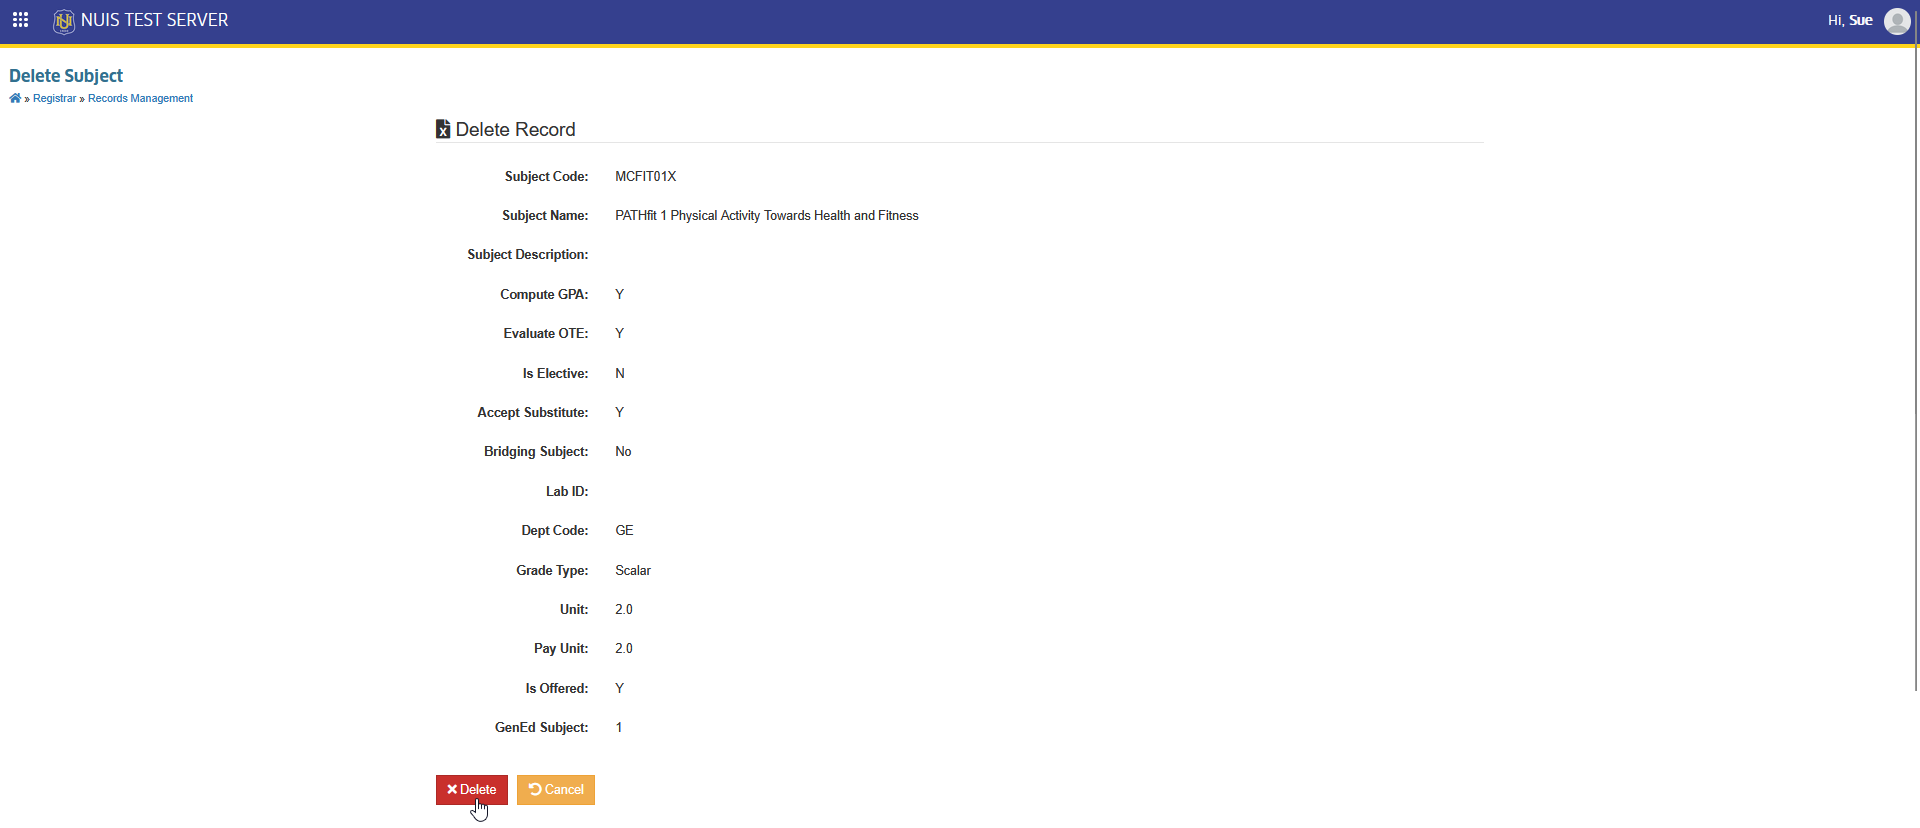
Records with existing references cannot be removed.
View Subject History Log
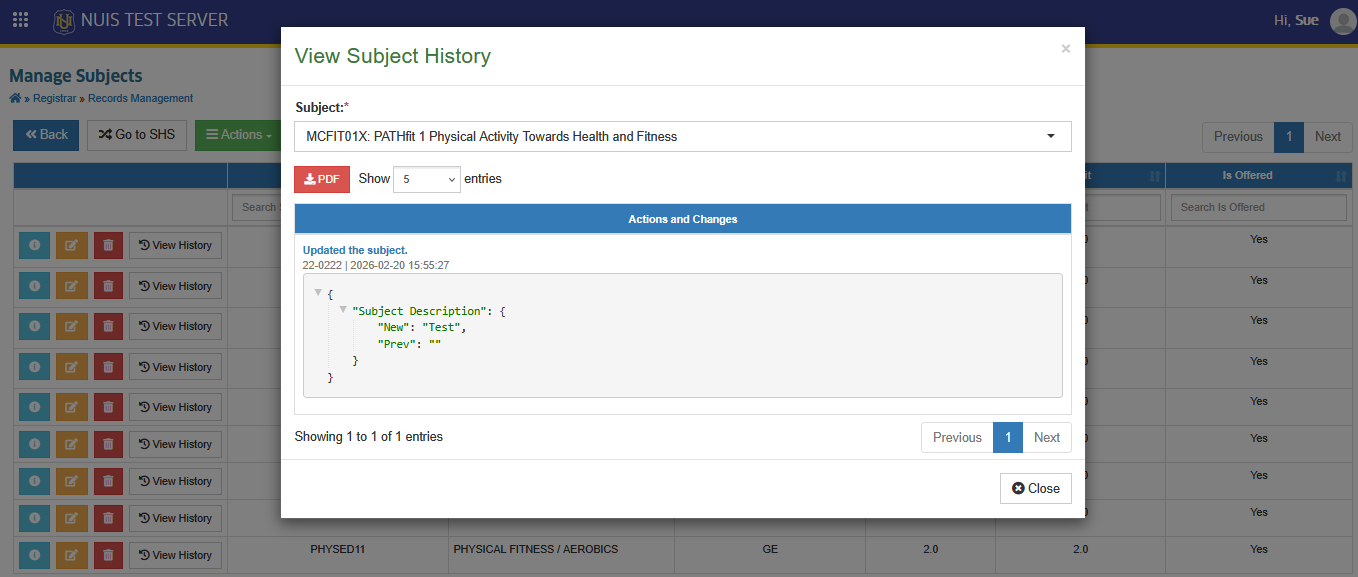
This section allows you to view the history of changes made to a subject record. It shows details such as what information was modified, who made the changes, and when the changes were made.
The history log helps in tracking updates and maintaining transparency in subject record management.
Follow the steps below to check subject's history log.
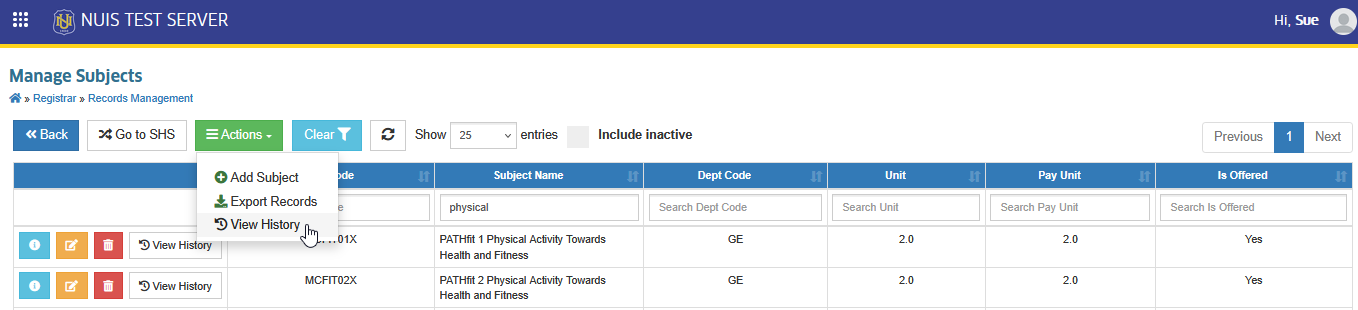
STEP 1. On the Manage Subject list view page, locate and click the button.
STEP 2. From the dropdown of actions, select and click the option. The View Subject History Prompt will appear.
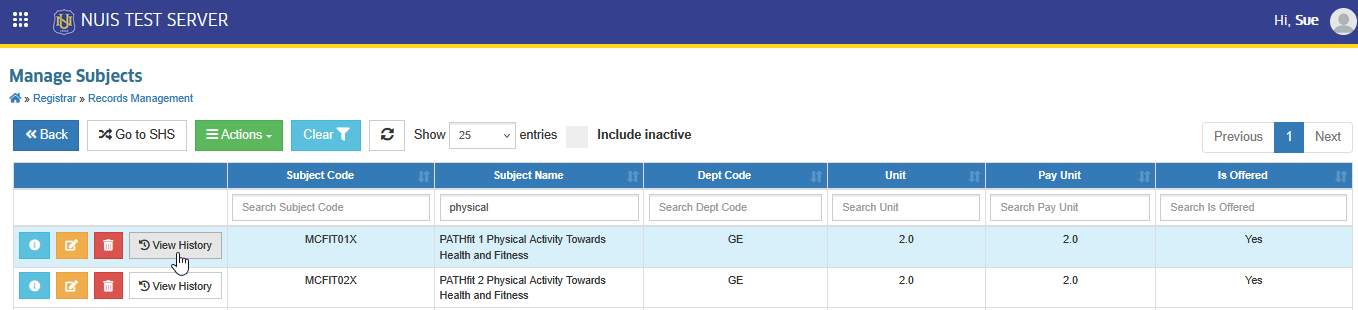
You may also click the button of the specific subject record in the list view page.
STEP 3. In the View Subject History prompt, select the subject from the dropdown. This will display the log history of specific subject.
Add Subject Equivalence
Follow the steps below to add subject equivalence.
STEP 1. On the Managa Subjects list view page, search for the specific subject and click it's corresponding button. The system will redirect to Edit Subject page.
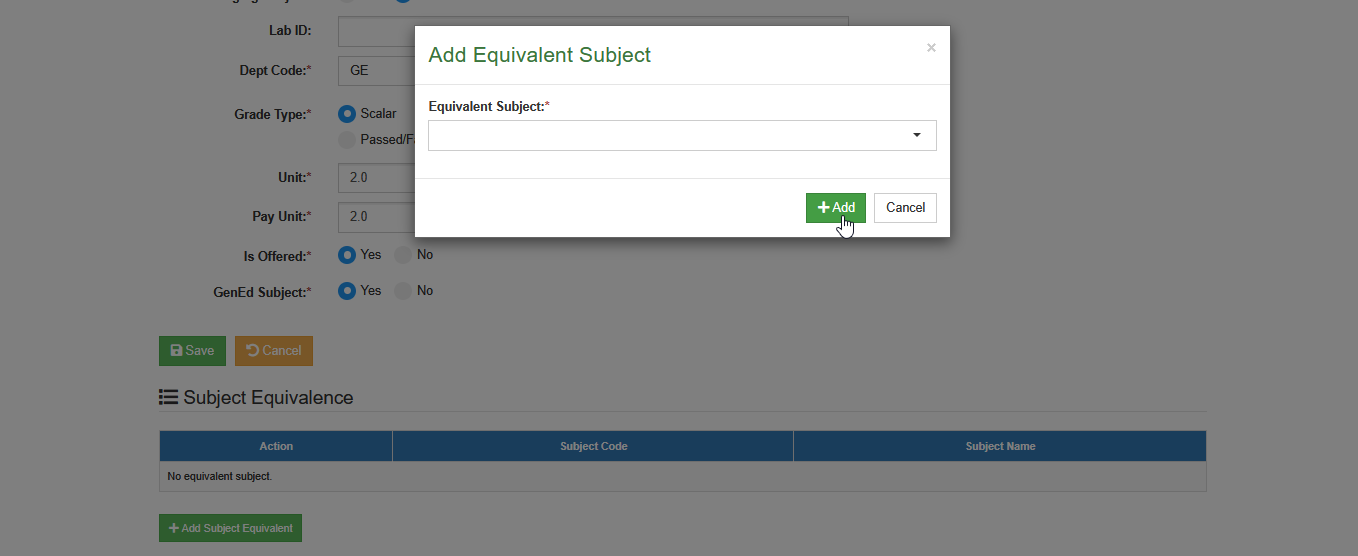
STEP 2. In the Edit Subject page, scroll down to Subject Equivalence section. Click the button. The Add Equivalent Subject propt will appear.

STEP 3. Select the subject from the dropdown list, then click the button.
Export Subject Record
Follow the steps below to download the subject record for offline backup.
STEP 1. On the Manage Subject list view page, locate and click the button.
STEP 2. From the dropdown of actions, select and click the option. The system will redirect to Export Subject page.
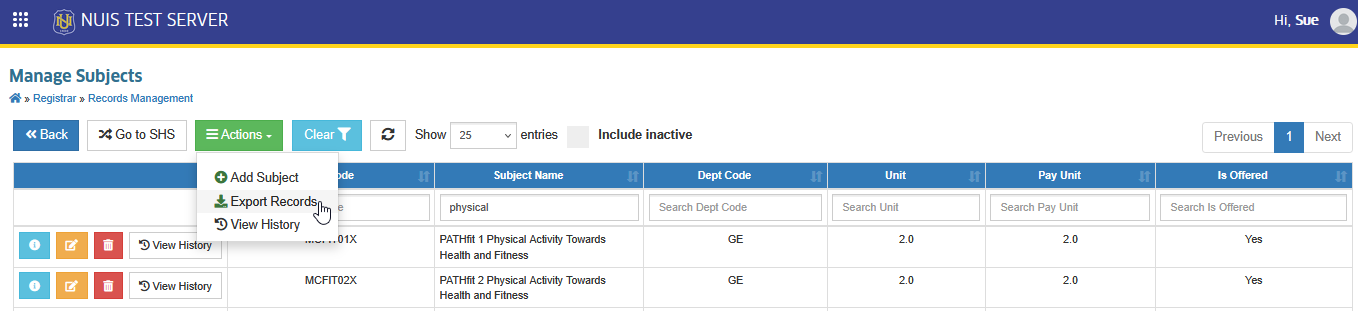
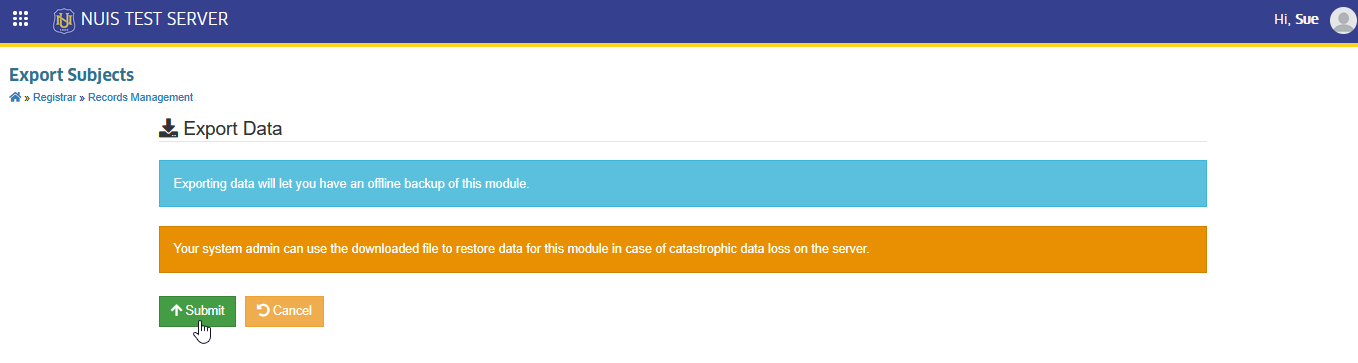
STEP 3. In the Export Subjects page, click the button. This action will generate the CSV file of the record.
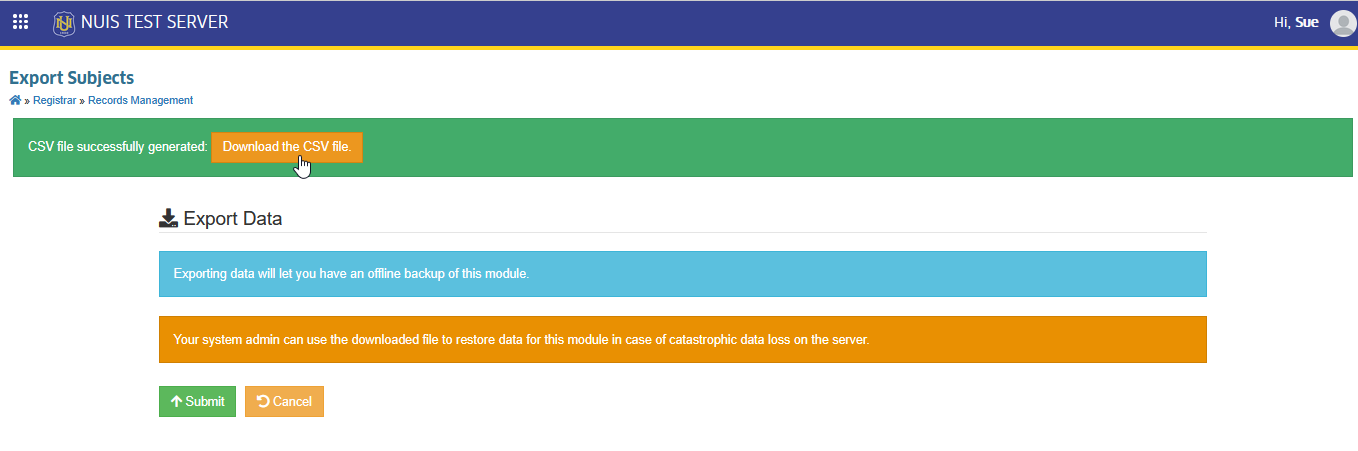
STEP 4. Download the CSV File by clicking the button.
For more questions or concerns, email us at nu-desk@national-u.edu.ph