Online Class Registration
Reservation and pre-registration to classes you wish to enroll on enrollment start.
The Online Class Registration module allows the Continuing Students to register for the classes for the upcoming term. It streamlines the registration process, enabling the students to view available courses, select their preferred classes, manage their schedules that is aligned to their curriculum flowcharts.
Online class registration is only available during the designated registration period. Important academic dates should always be checked on the school calendar.
Module Features
-
Class Search and Filter - Allows the students to browse all class offerings per section or per class/subject for the term.
-
Prerequisite Verification - Automatically checks prerequisites for the selected classes, ensuring students meet course requirements before registering.
-
Add to List/Class Bucket - Enables students to add chosen classes to a Class Bucket for easy review before finalizing their selections.
-
History Logs - Maintains a log of all registration actions. This allows students to track their registration history and review any changes made over time.
-
View Temporary Assessment - Displays a temporary assessment of tuition and fees based on the selected classes.
Required Permission
- Online Class Registration - This permission allows the users to access and register for classes to take for the next term. With this permission, the user may utilize all the above mentioned Module Feature.
How to access the module
To access the module, make sure you have the Online Class Registration permission. If it doesn’t appear in your portal, request access from your System Administrator.
To access the module go to Students > Online Class Registration
Click the module tab to redirect to Online Class Registration page.
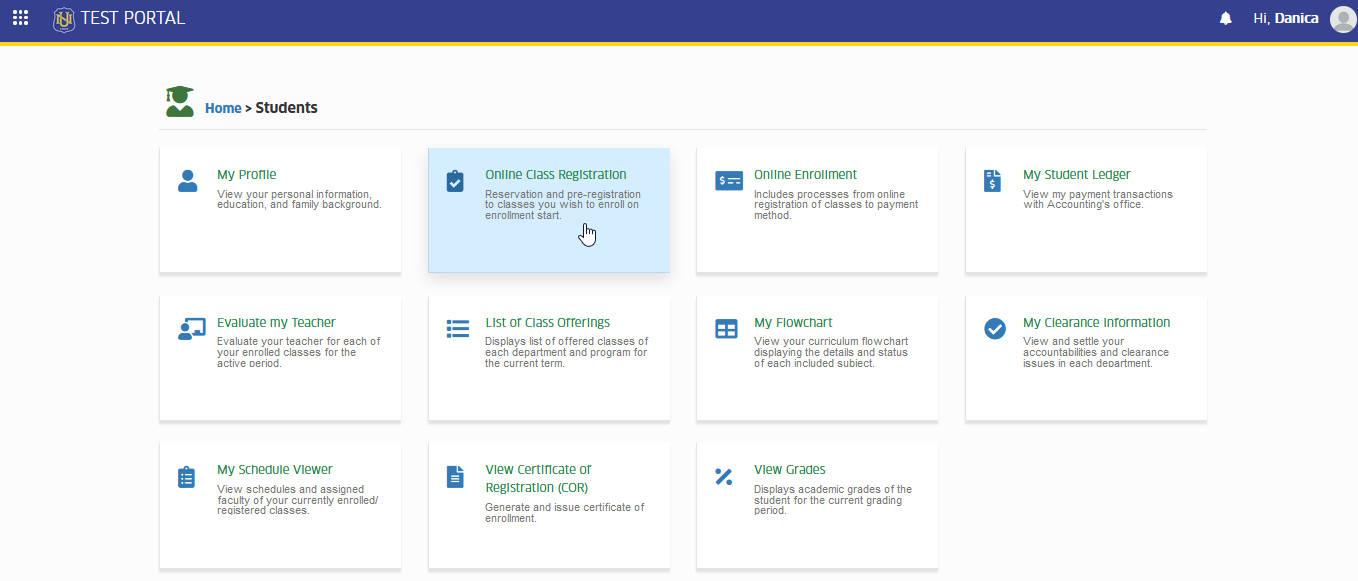
How to Use the module.
In this guide, the process of registering for classes using the Online Class Registration module will be explained. Through this module, available courses can be searched, classes can be selected and registration can be completed. Follow the steps below on how to register to classes.
STEP 1. Login to NUIS Student portal.
STEP 2. From the available modules on student portal, select Online Class Registration module.
STEP 3. Read and understand the reminders and aggreement. Click the button to proceed to registration page.
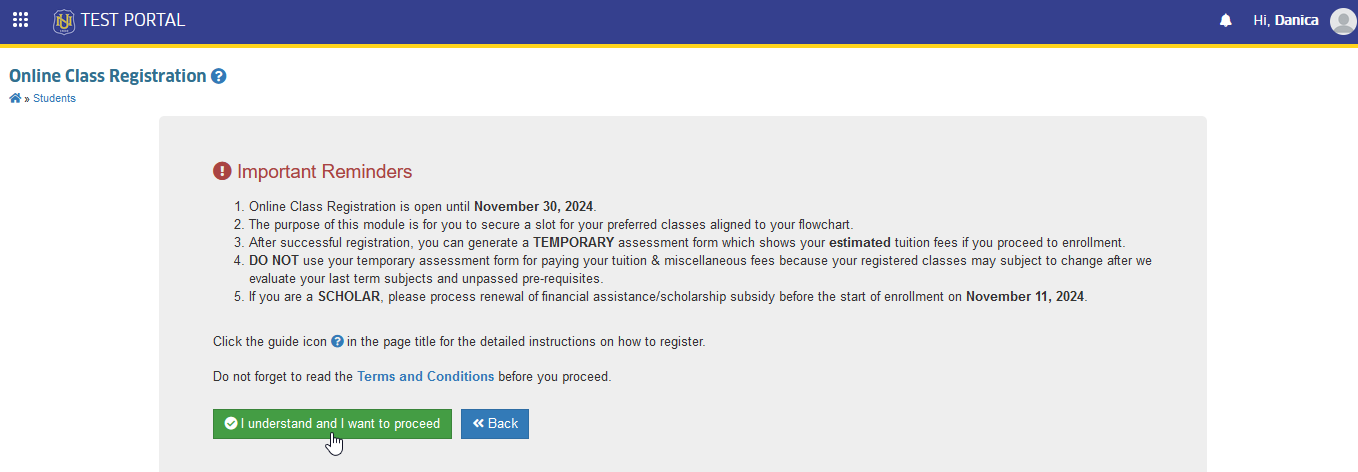
STEP 4. Add the preferred classes thru either of the following:
A. Register thru a section.
B. Register thru a subject.
STEP 5. Preregister the classes in the class bucket.
STEP 6. Finalize and submit the list of preregistered classes.
STEP 7. View and review the temporary assessment.
-
Ensure that all preferred classes are included before the list of preregistered classes is submitted for registration.
-
The issued Assessment Form is just Temporary and may be subject to change at the start of enrollment. Early payment in not recommended.
How to Register to a Section
This guide provides step-by-step instructions on how to register to a section. By following these steps, student will be able to select and register to classes under the specific section.
STEP 1. Scroll down to Register tab under Enrollment Evaluation section.
STEP 2. Select/click the Per Section option.
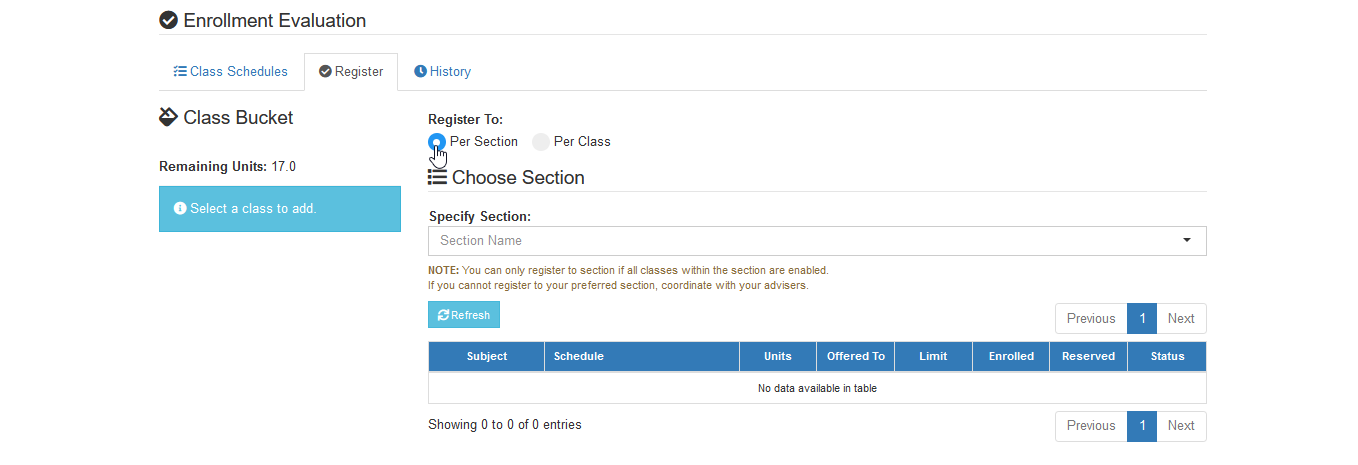
STEP 3. Specify and look for the preferred section name.
STEP 4. Make sure that all classes falling under the specified section are enabled.
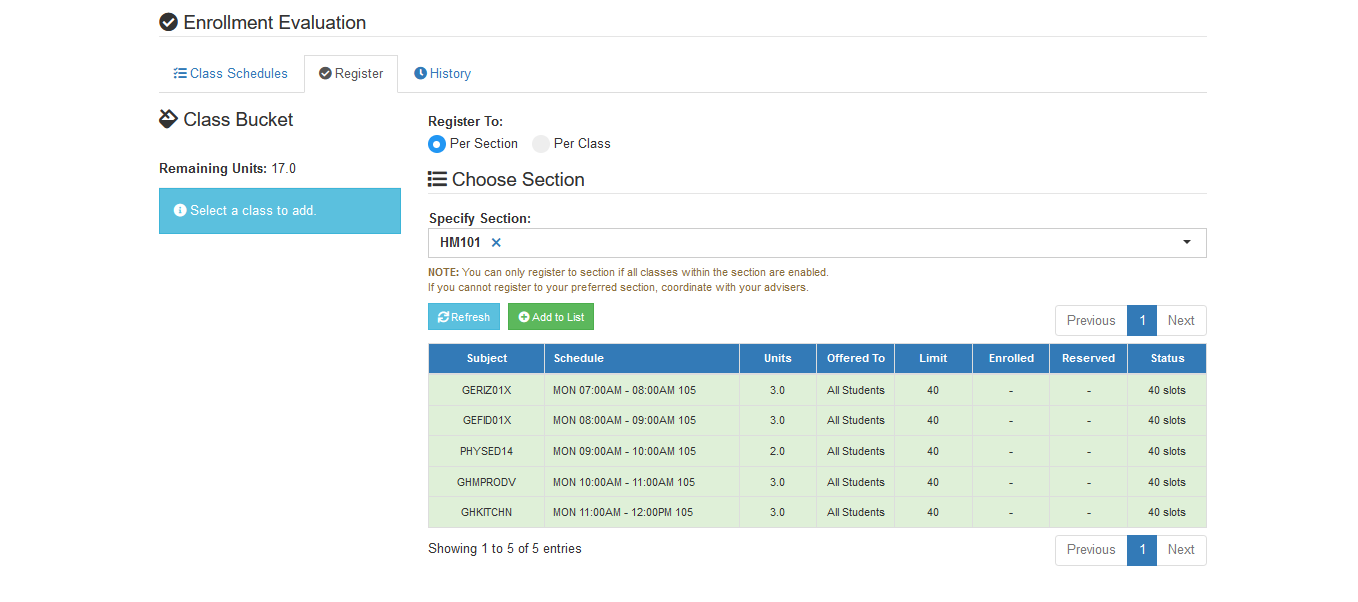
STEP 5. Click button to add all the classes in the Class Bucket.
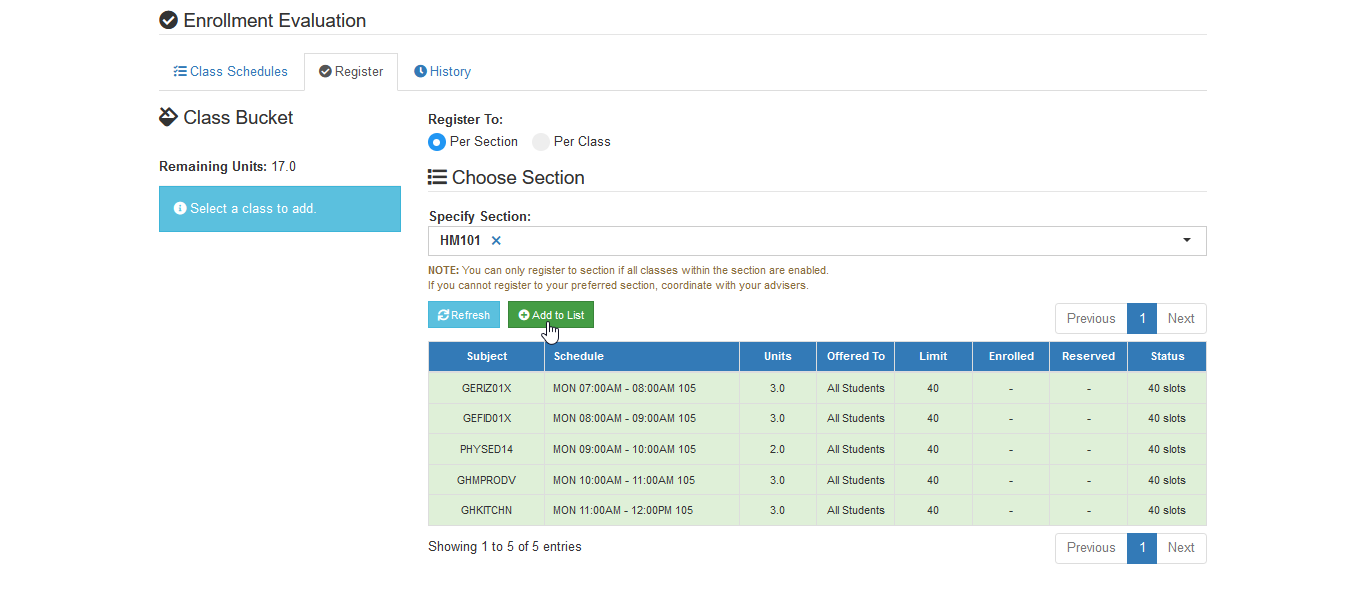
STEP 6. All preferred classes should be added as long as the remaining units suffice for the the total bucket. Click the button to review the selected classes.
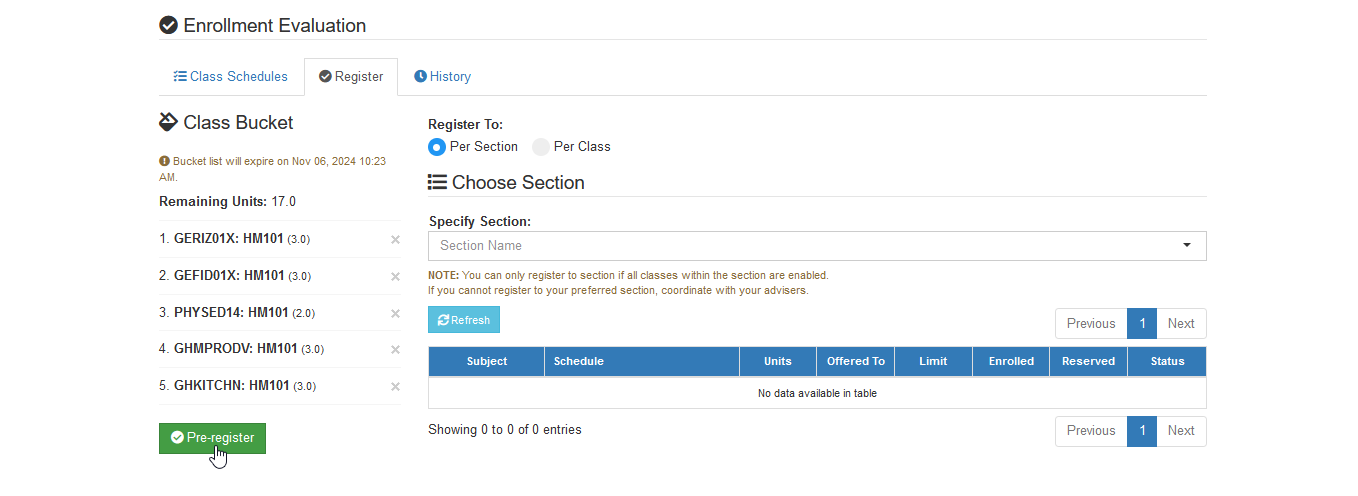
Subjects added to the class bucket will expire if they are not submitted to preregistration.
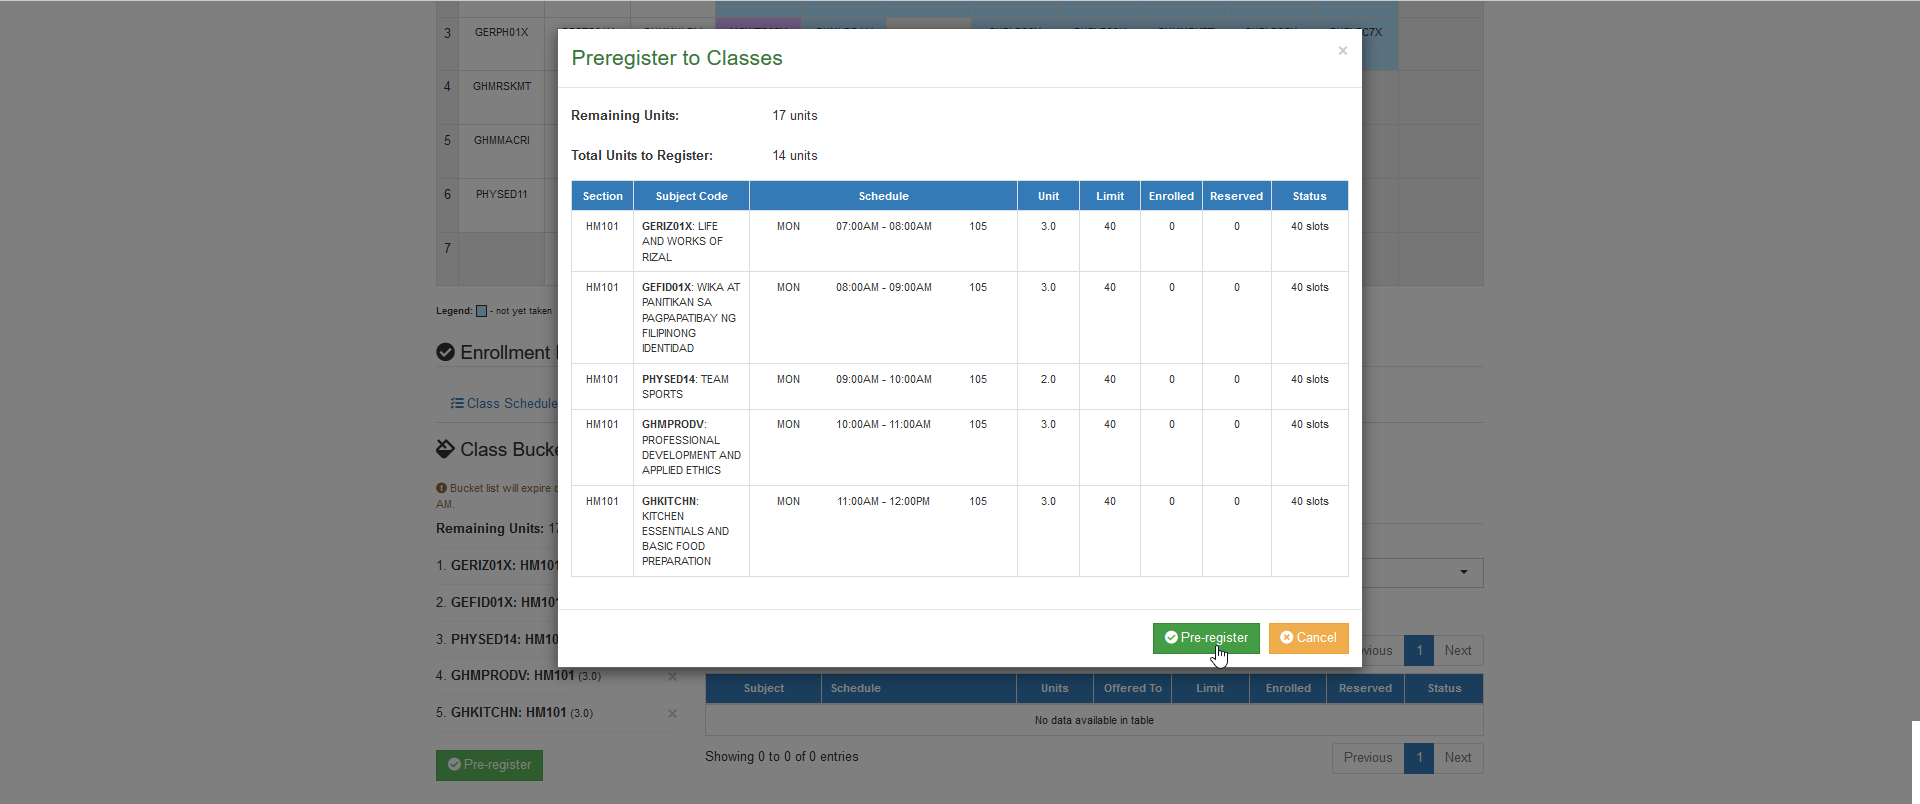
STEP 7. A prompt will appear, confirm the pre-registration by clicking the button.
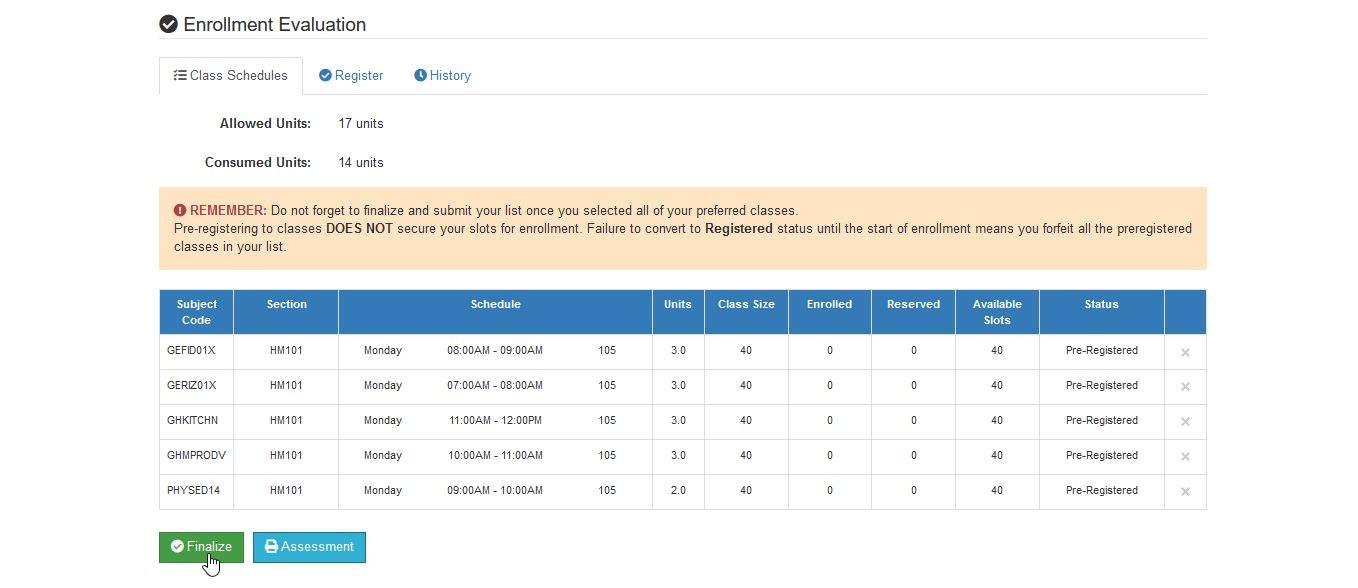
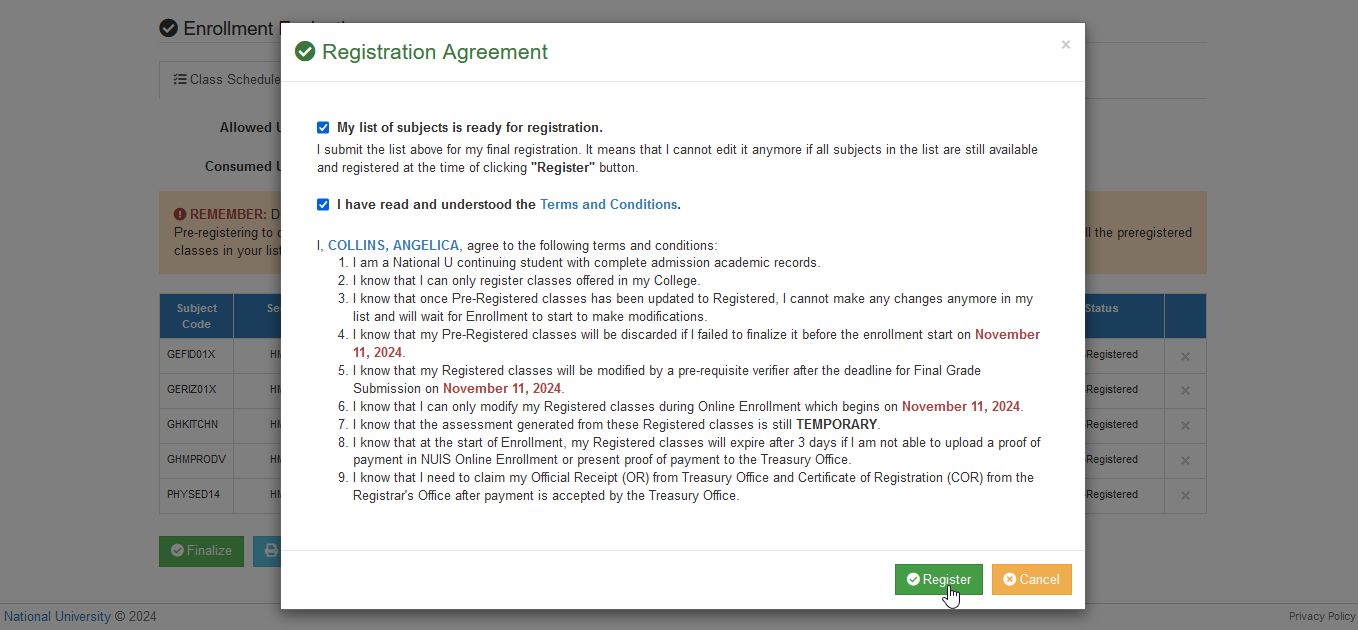
STEP 8. Review the list of pre-registered classes. Once done, click the button. A Registration Agreement promt will appear, read and understand the aggreement. Agree to terms and condition and click the button to secure a slot on the list of classes that was submitted.
-
All selected classes will now be updated to Registered status.
-
Student will not be able to modify the list of registered subject once finalized.
-
At the start of Enrollment Period, the list of registered classes may expire after 7 days if the student will not be able to upload a proof of payment in NUIS Online Enrollment module or present proof of payment to the Treasury Office.
-
Registered classes will be modified by a pre-requisite verifier after the deadline for Final Grade Submission.
-
View the temporary assessment by clicking the button.
How to Register per Class
This guide will outline the steps to register for individual class option. By following these instructions, user will be able to easily select and register their preferred specific classes to take for the next term.
STEP 1. Scroll down to Register tab under Enrollment Evaluation section.
STEP 2. Select/click the Per Class option.
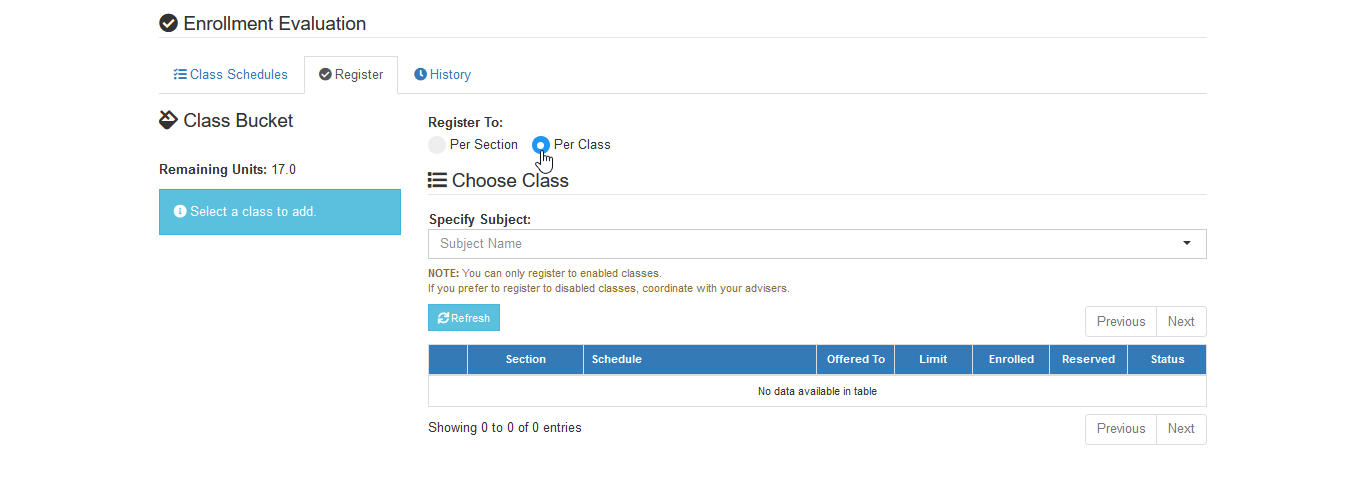
STEP 3. Specify and look for the preferred subject.
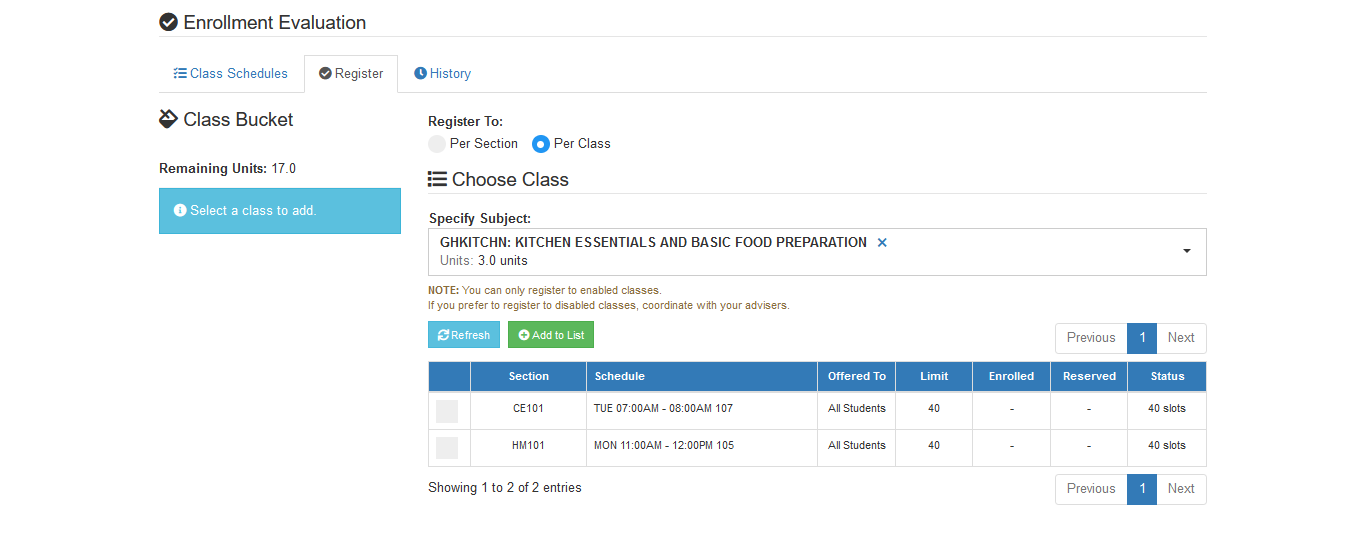
User can also click the subject in the flowchart and click on the button.
STEP 4. In the list of available classes, check the preferred one and click the button.
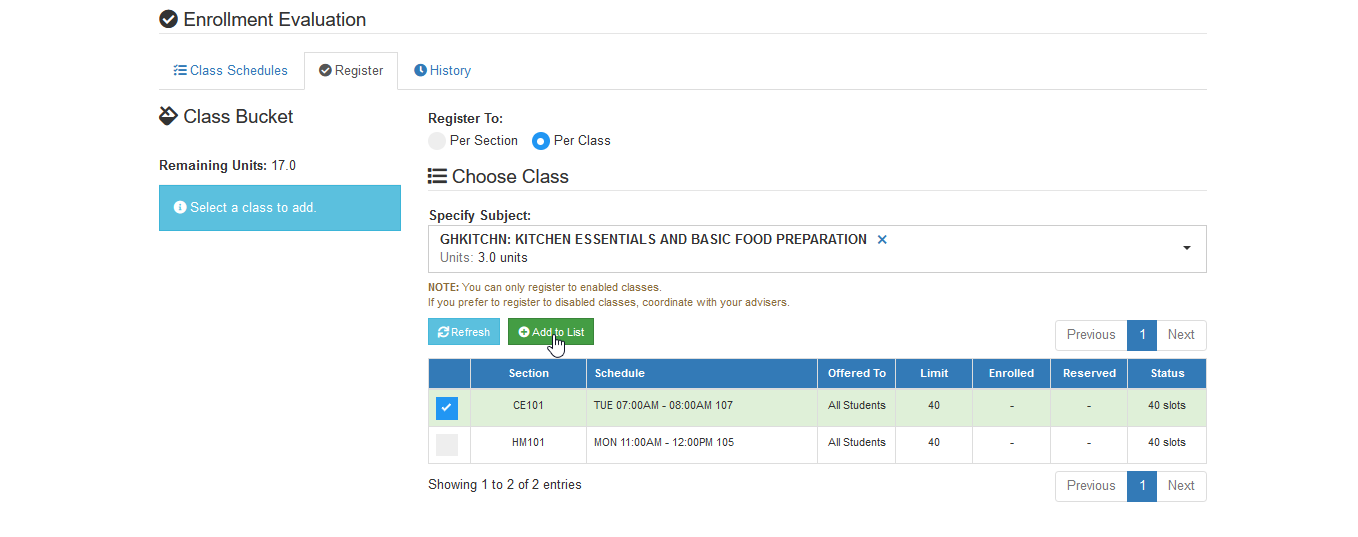
Once added, the class will be moved to the Class Bucket. Continue selecting classes until the maximum allowed units are reached.
STEP 5. Once all classes has been added to class bucket, click the button.
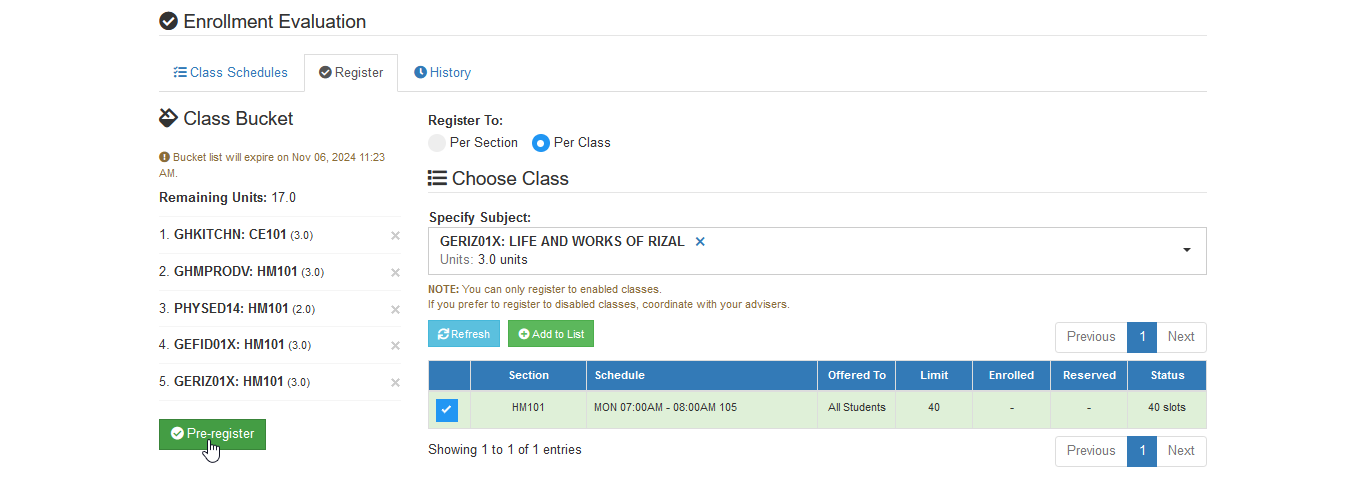
STEP 6. A prompt will appear, confirm the pre-registration by clicking the button.
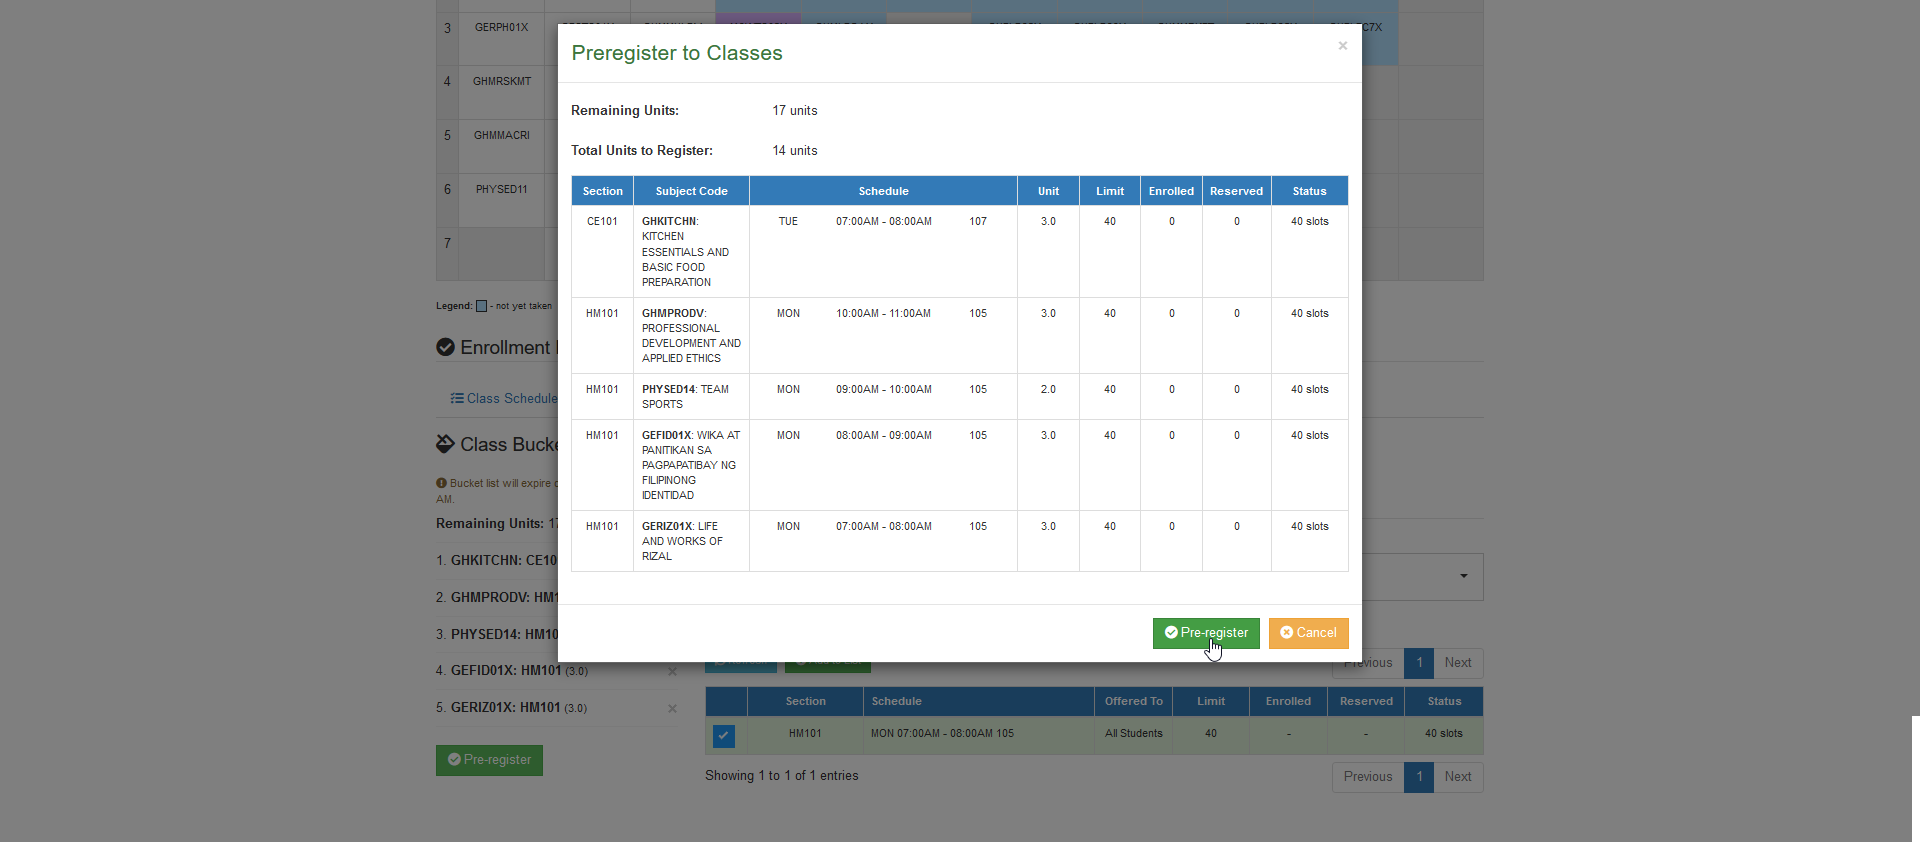
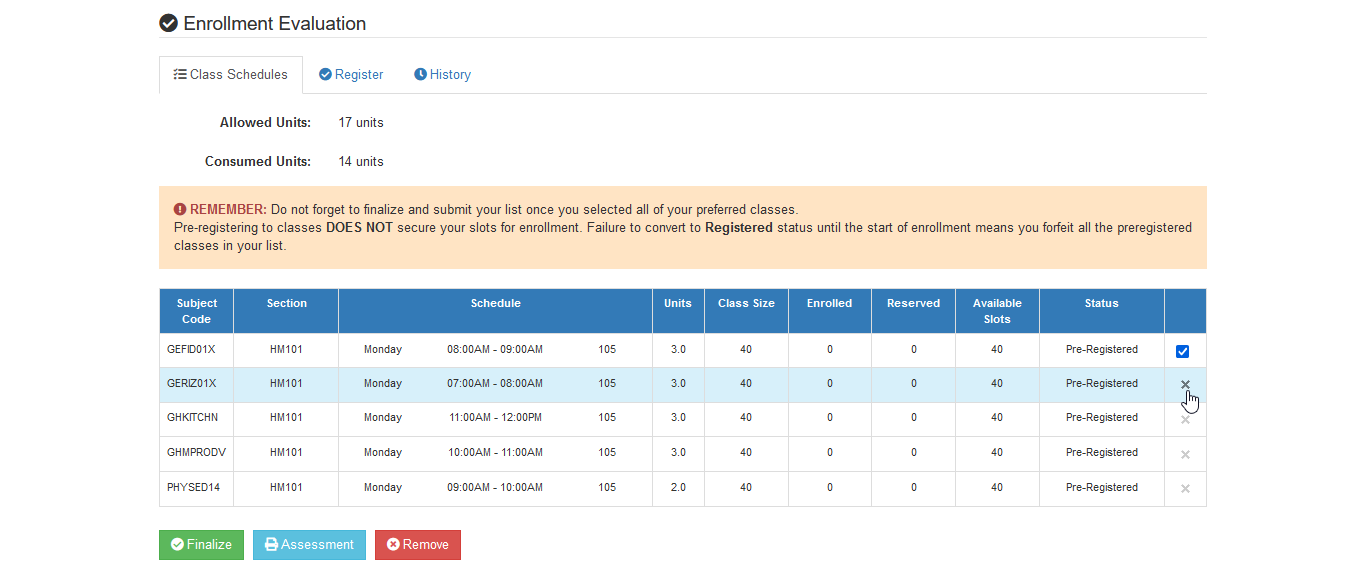
STEP 7. Review the list of pre-registered classes. Once done, click the button. A Registration Agreement promt will appear, read and understand the aggreement. Agree to terms and condition and click the button to secure a slot on the list of classes that was submitted.
How to remove Pre-registered class
Users can remove a class from the list of subjects to be registered if it has not yet been finalized. Follow the instructions to remove the class from the list.
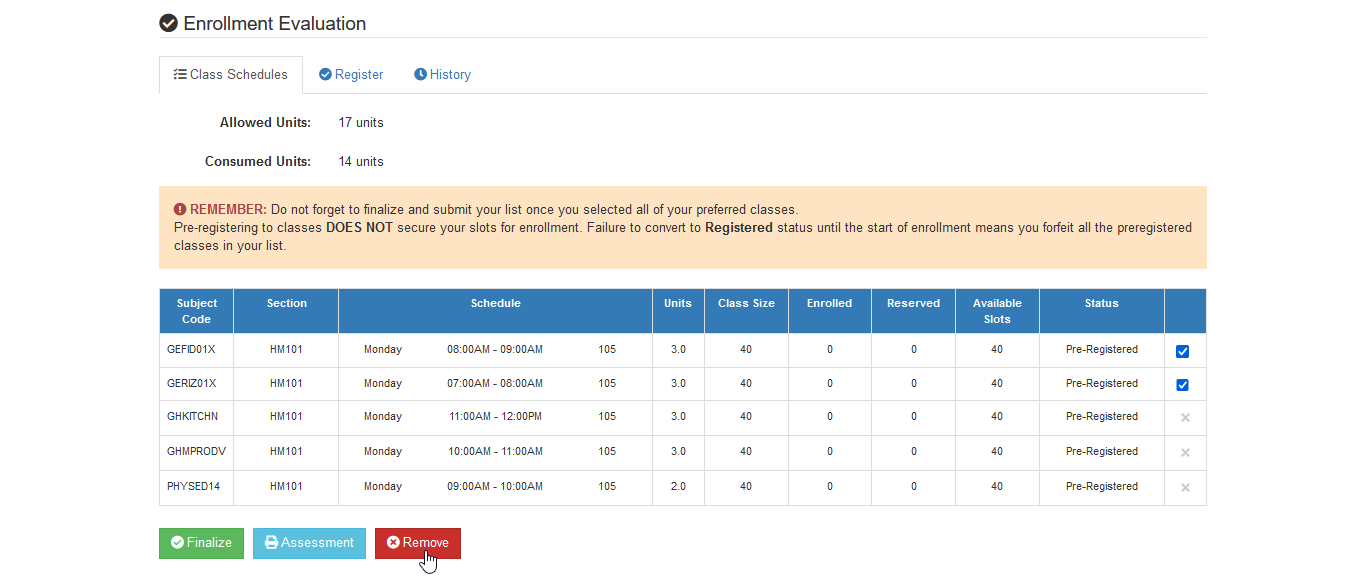
STEP 1. In the list of pre-registered classes, select the subject/s to be removed by clicking the X button of the class schedule.
STEP 2. Once all the subject to be removed have been selected, click the button and confirm the removal of the selected subjects from the list.
Frequently Asked Questions
You are not allowed to take class of a subject if you haven't passed its prerequisites yet.
Yes, you are still allowed to modify your class schedules once you submitted the bucket. However, you will no longer be allowed to modify once you finalize your class schedules. You have to wait for Enrollment period to do that or you need to seek assistance from your Program Chair for personal advising.
Inquire from your college/department for availability of class offerings.
Check the Class’ status column why it is disabled. If you believe you are allowed to take that disabled class, coordinate with your Program chair, otherwise, select other sections or classes.
It’s possible that your fee schedules are being prepared yet by the Treasury & Registrar Office. Coordinate with their office or wait until Enrollment period starts
You are not yet advised to pay your registered classes during Class Registration period. Wait for the Enrollment period to settle your payments.
For more questions or concerns, email us at nuis@national-u.edu.ph