Online Enrollment
Includes processes from online registration of classes to payment method.
The Online Enrollment module streamlines the course enrollment and payment process, allowing students to register and pay for classes quickly and efficiently. With this module, students can view available courses, check prerequisites, select their desired classes, and finalize their registration all from a user-friendly interface. Once course selection is complete, students can proceed to the payment section to review fees and choose their preferred payment method, ensuring smooth financial processing.
-
Online Enrollment is only available during designated enrollment period. Important academic dates should always be checked on the Academic Calendar module.
-
This module is used by Continuing Students only.
-
For students with scholarship grants, the scholarship should be renewed first before proceeding with enrollment to ensure the correct computation of total matriculation fees.
-
Returning Student's may use this module to proceed to payment for their enrollment.
Module Features
-
Course Selection - Easily browse and select from available course.
-
Prerequisite Verification - Automatically checks prerequisites for the selected classes, ensuring students meet course requirements before registering.
-
Add to List/Class Bucket - Enables students to add chosen classes to a Class Bucket for easy review before finalizing their selections.
-
History Logs - Maintains a log of all registration actions. This allows students to track their registration history and review any changes made over time.
-
Payment Processing - After selecting courses, go to payment section to view total fees and choose from available payment methods for easy checkout.
Required Permission
- Online Enrollment - Allows the students to access and manage the online enrollment process. With this permission, user can browse available course, add or remove classes, and proceed through the payment steps.
How to access the module
To access the module, make sure you have the Online Enrollment permission. If it doesn’t appear in your portal, request access from your System Administrator.
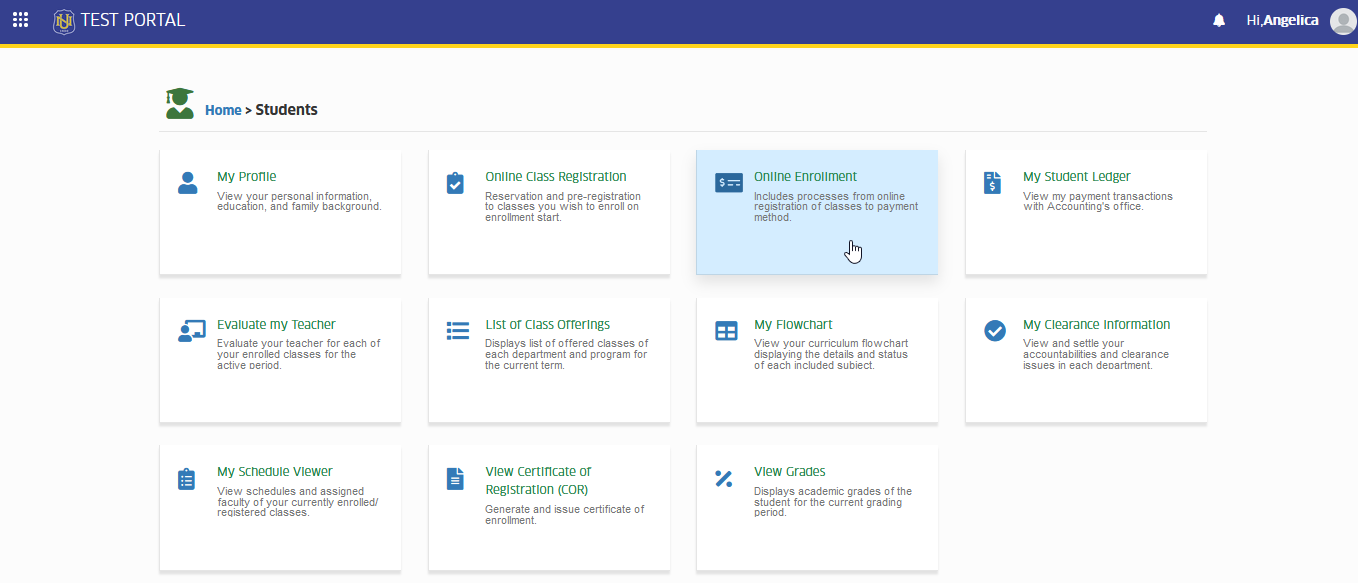
To access the module go to Students > Online Enrollment
Click the module tab to redirect to Online Enrollment page.
How to Enroll the Registered subjects
Online Enrollment and Online Class Registration are the same, the online difference is that: in Online Enrollment, students can proceed to make payment or upload proof of payment for their registered subjects.
Follow the steps below to enroll if the registered subjects during Online Class Registration were not modified due to following reasons:
-
Prerequisite validation - After the final grade submission, the Registrar's Office will run the prerequisite checker. This action will remove all registered subjects for which the prerequisite was not passed.
-
Change in subject information - The registered class may be modified if there is an update to the subject's information, such as changes in schedule, instructor, or course details.
-
Incomplete registered subjects - In some cases, a student may register for only one subject during Online Class Registration without fully understanding the rules and agreements presented in the module.
STEP 1. Login to NUIS and go to Students > Online Enrollment.
STEP 2. In Online Enrollment page, in Class Schedules tab, under Enrollment Evaluation section, review all registered subjects and click the button.
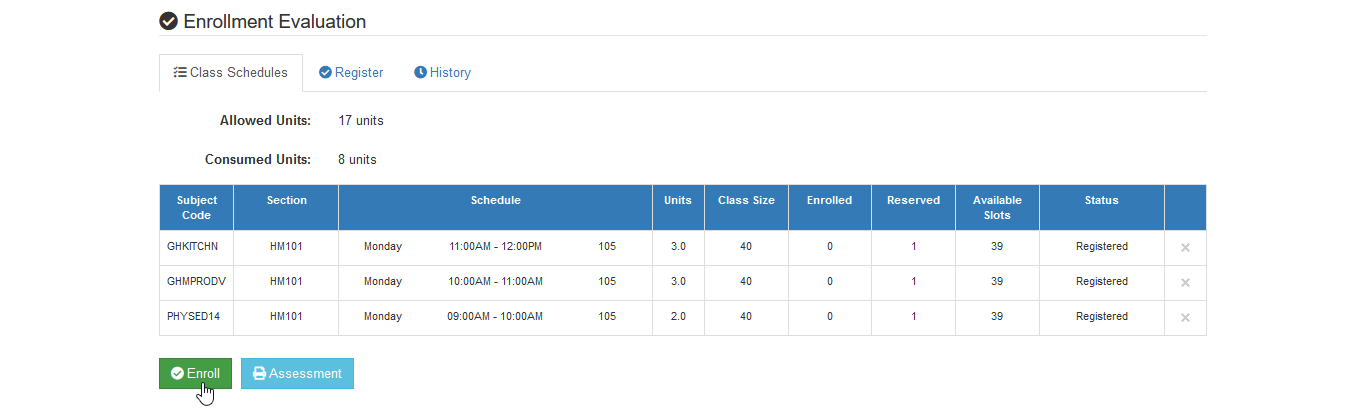
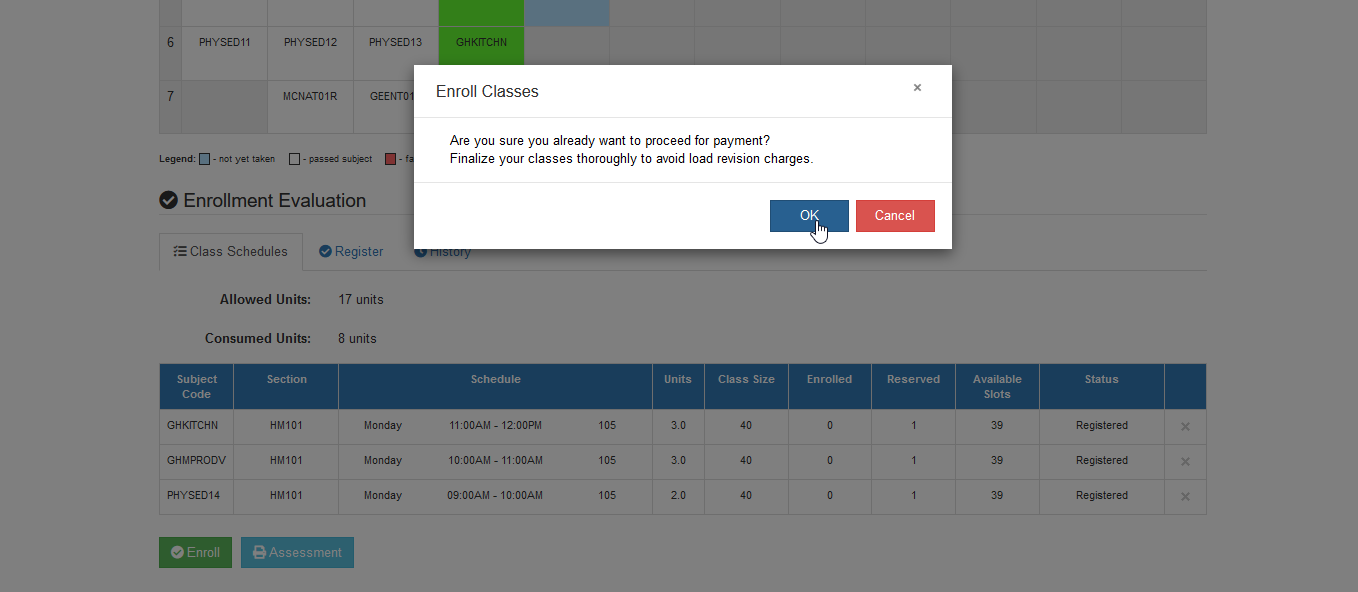
STEP 3. Confirm the action by clicking button.
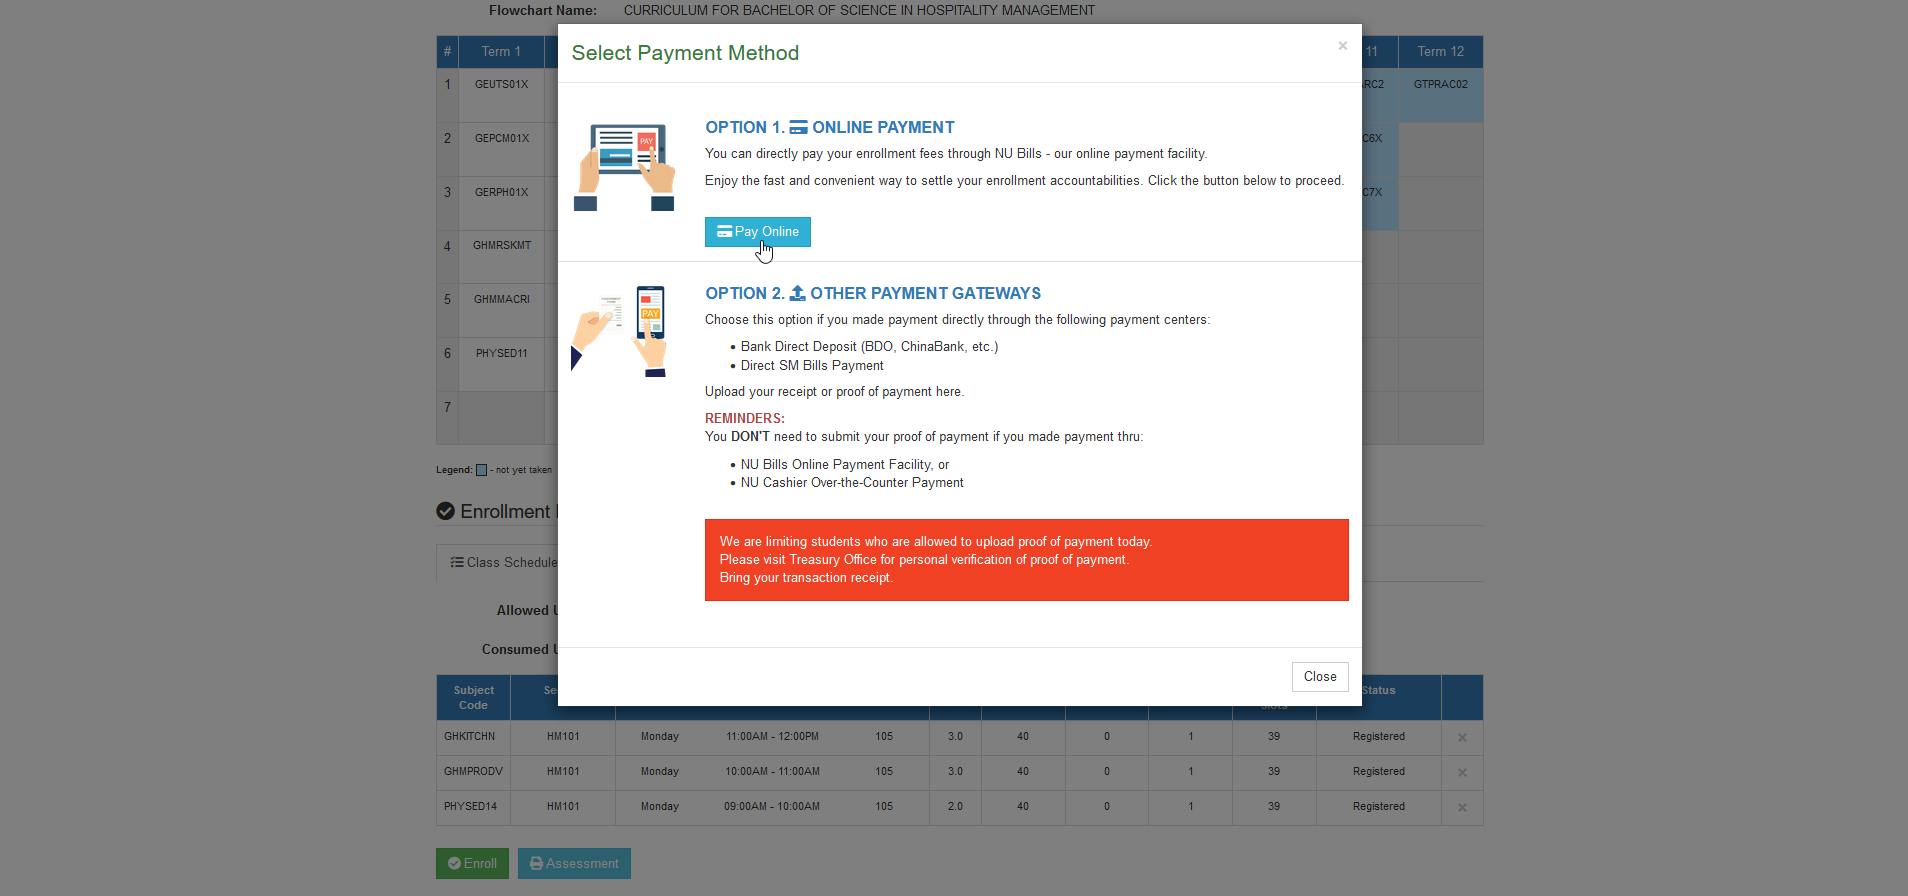
STEP 4. A prompt will appear, displaying the payment method option. Select one of the following:
Online Payment
- Directly pay enrollment fees securely through NU Bills - National University online payment facility.
Other Payment Gateway
-
Bank Direct Deposit (BDO, ChinaBank, etc.)
-
Direct SM Bills Payment
-
Upload the proof of payment or bring the transaction reciept to the Treasury Office for verification.
How to Pay Online
If the student, guardian or the employee selected the online payment method. Follow the simple guide to pay matriculation online.
STEP 1. In Payment Method Selection prompt, select the Online Payment option and click the button. This action will redirect the user to NU BILLS portal.
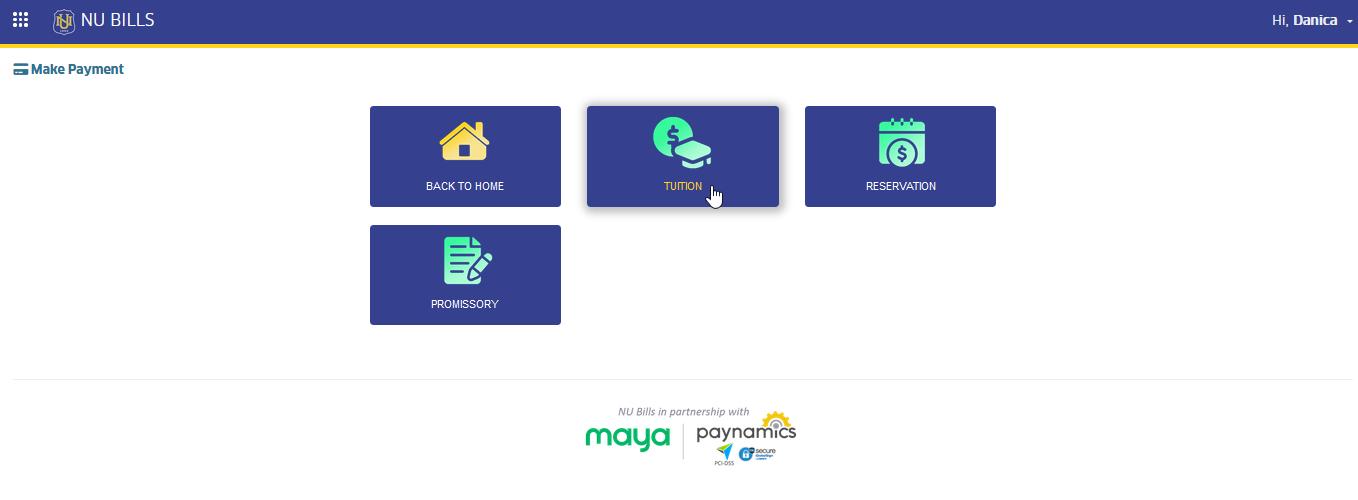
STEP 2. In NU BILLS portal, go to PAY > TUITION. The page will redirect to Pay Enrollment Fees page.
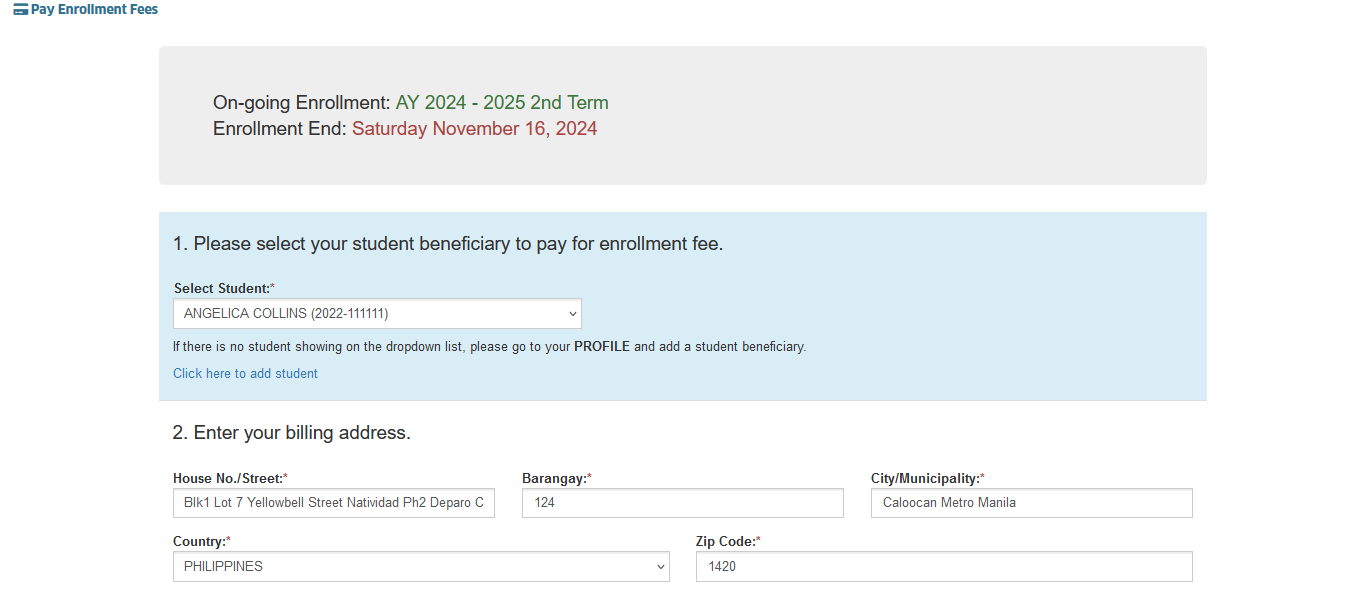
STEP 3. On the Pay Enrollment Fees page, the student’s name should be entered in the student selection field, and the billing address should be provided. Ensure all required fields are filled out.
STEP 4. Select payment option. Choose from the available payment option during enrollment period.
Auto-Enroll: Full Matriculation Payment
-
This payment option is only available during enrollment period.
-
Cash payment discount is automatically deducted from the total fees if payment is made on or before Cash Payment Due Date.
-
User cannot modify the amount.
Auto-Enroll: Installment Payment
-
This payment option is only available during enrollment period.
-
User cannot modify the down payment amount set by the Treasury Office.
Balance Payment
- User can enter his/her preferred amount.
STEP 5. Confirm the selected payment option. Click the button and proceed to payment. Agree to Terms and Conditions by clicking the button.
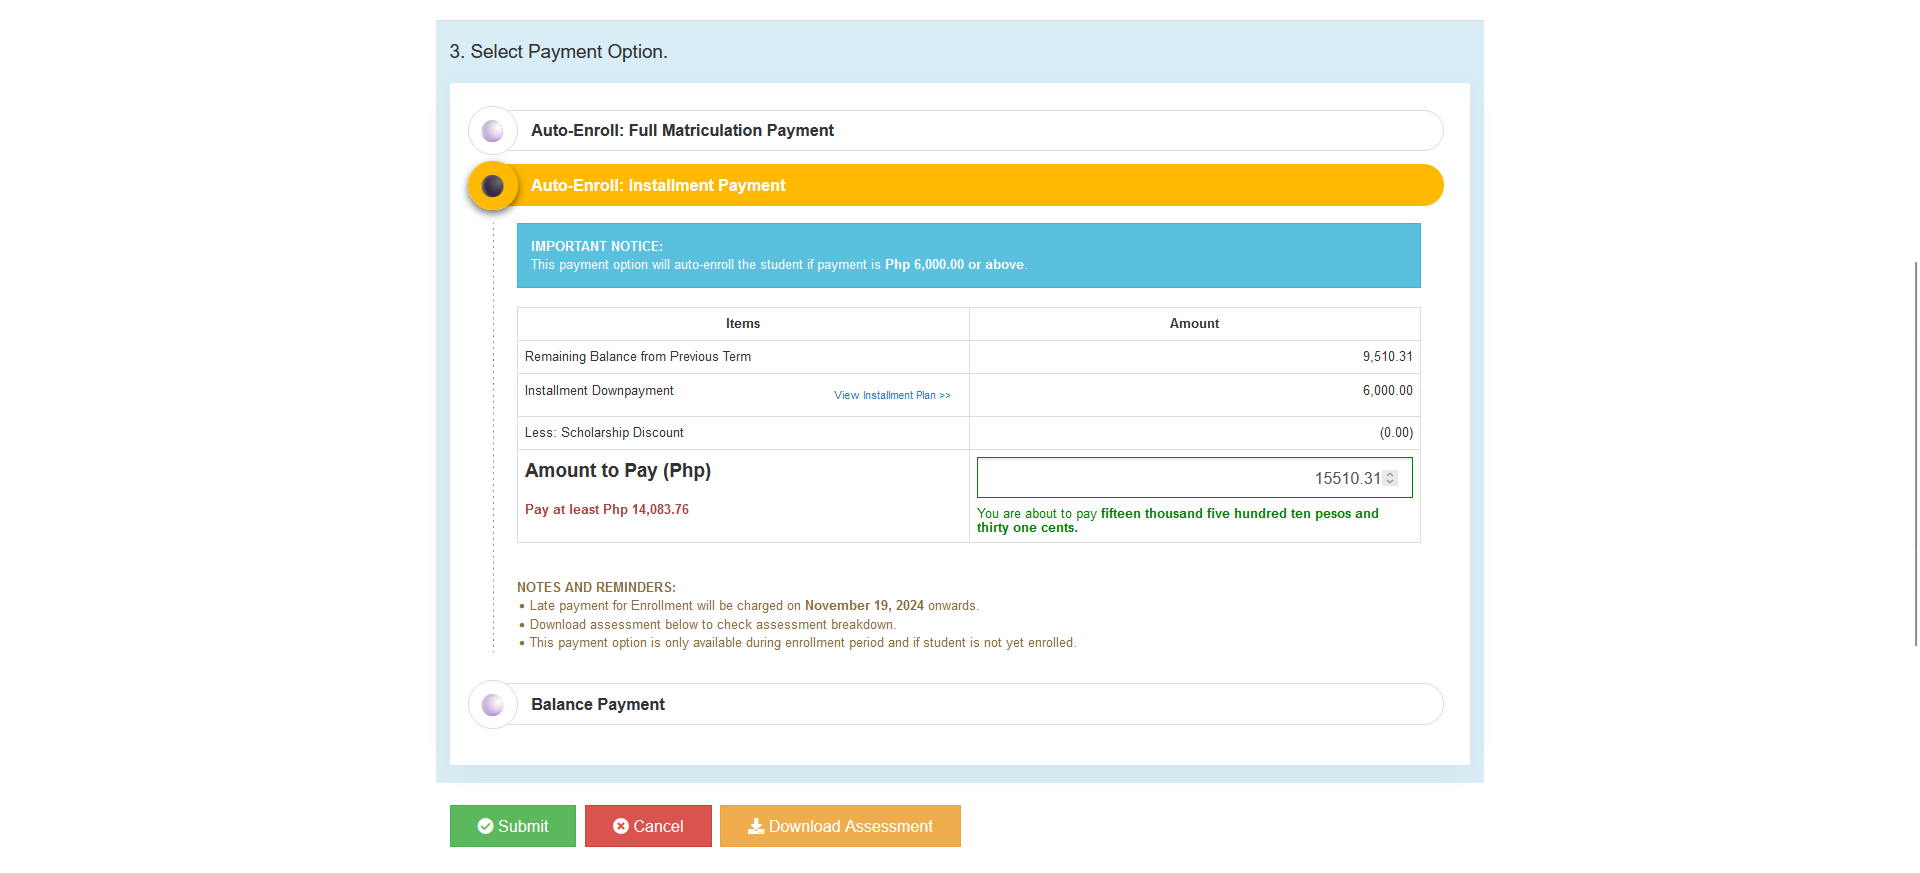
User may download a copy of the assessment by clicking the button.
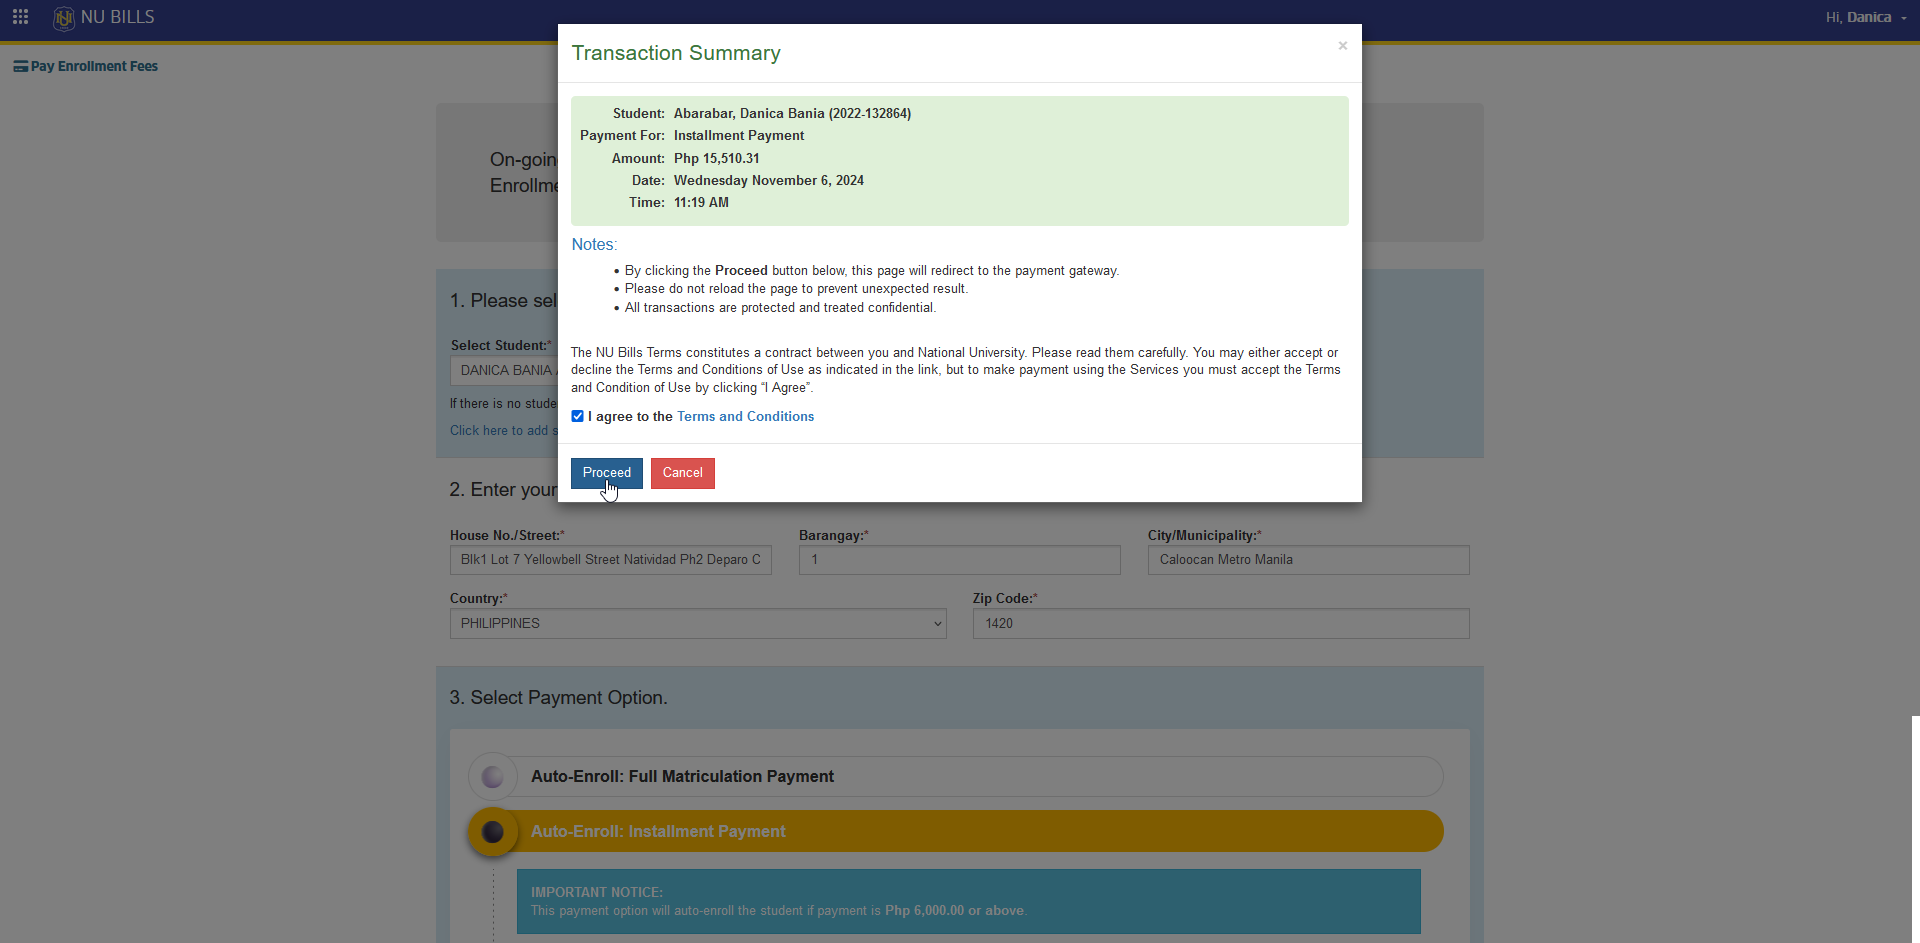
STEP 6. Make payment using the preferred payment channels availble in payment gateways (Maya, Paynamics).
Upload the proof of payment
During enrollment period, the Treasury office enables the proof of payment upload feature in the Online Enrollment module. Just simply upload your proof of payment and wait for verification to be officially enrolled. If in case this feature is disabled, visit the Treasury office in person with your proof of payment for verification.
How to register to a single subject
Same steps applied to Online Class Registration, you can register to your preferred classes for each subject by following the instruction below:
STEP 1. In Online Enrollment page, scroll down to Register tab under Enrollment Evaluation section.
STEP 2. Select/click the Per Class option.
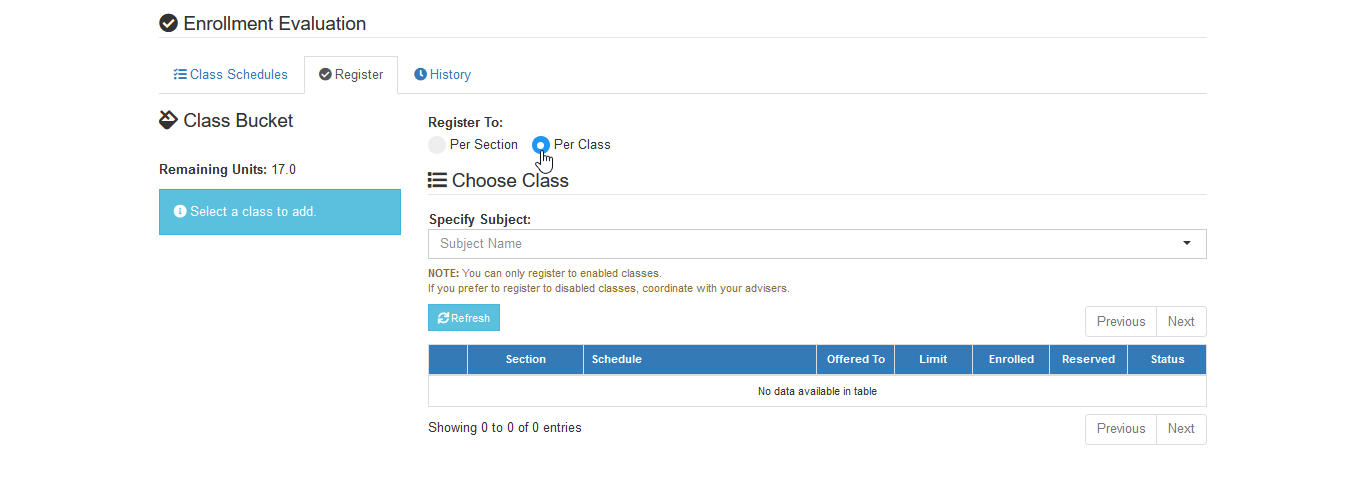
STEP 3. Specify and look for the preferred subject.
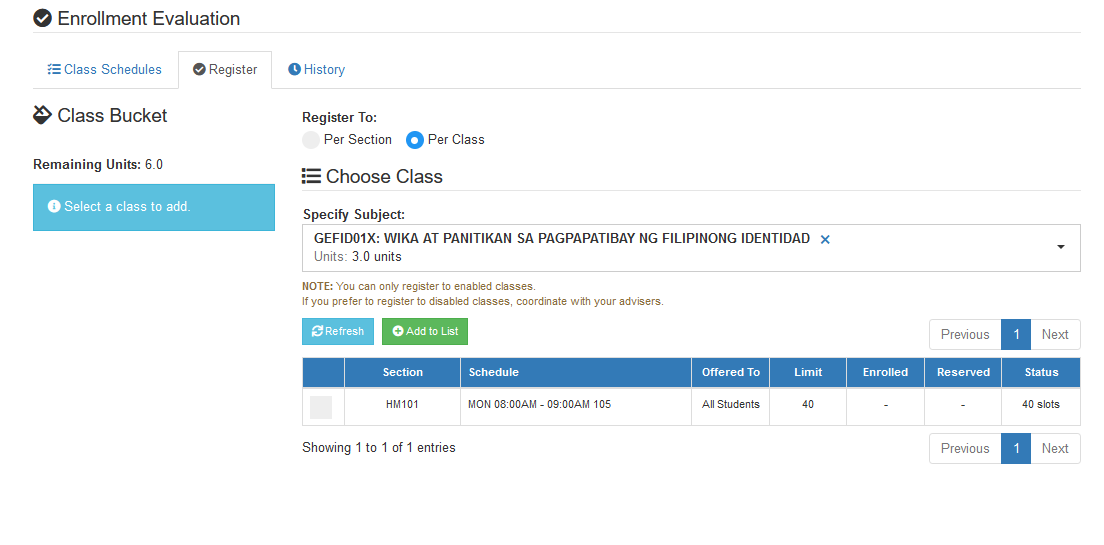
User can also click the subject in the flowchart and click on the button.
STEP 4. In the list of available classes, check the preferred one and click the button.
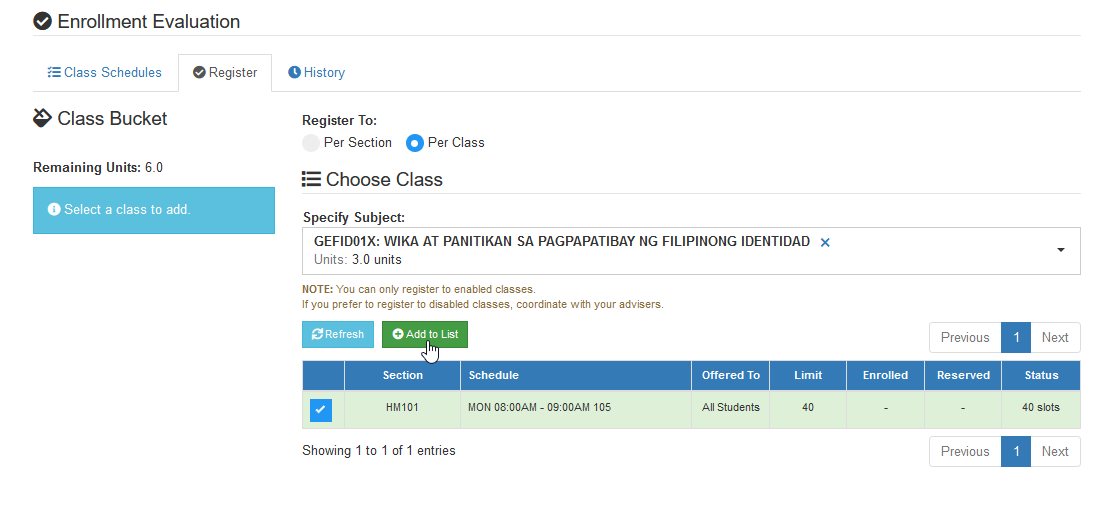
Once added, the class will be moved to the Class Bucket. Continue selecting classes until the maximum allowed units are reached.
STEP 5. Once all classes has been added to class bucket, click the button.
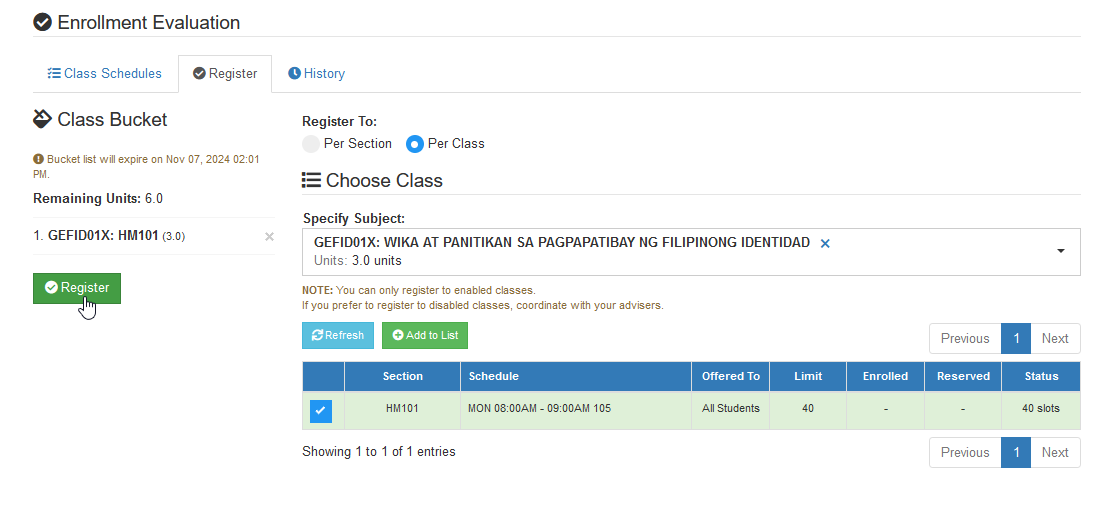
STEP 6. A prompt will appear, confirm the registration by clicking the button.
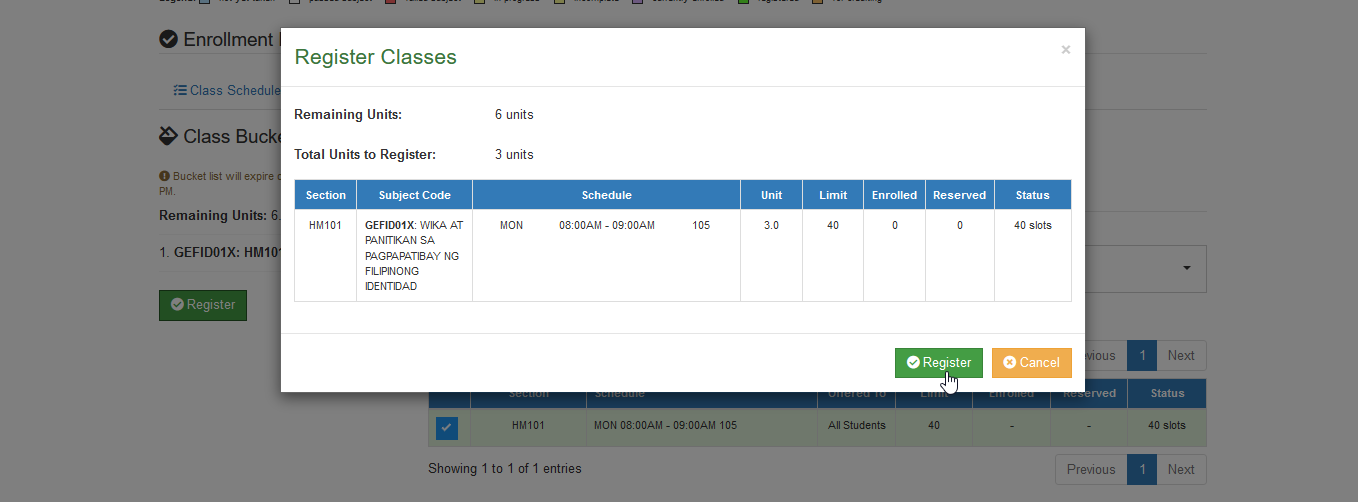
The specified class is now added to the list of registered classes. Proceed to enrollment by clicking the button.
How to Register per section
If the student wishes to modify their registered class and choose a different section. This guide provides step-by-step instructions on how to register for another section. By following these steps, student will be able to select and enroll to classes under the desired section.
STEP 1. In Online Enrollment page, scroll down to Register tab under Enrollment Evaluation section.
STEP 2. Select/click the Per Section option.
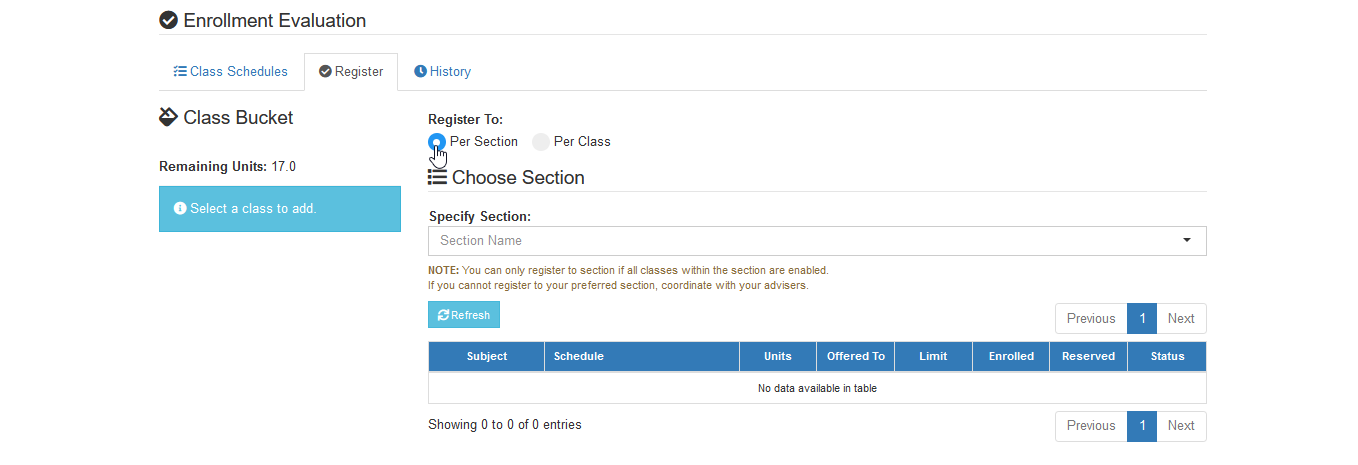
STEP 3. Specify and look for the preferred section name.
STEP 4. Make sure that all classes falling under the specified section are enabled.
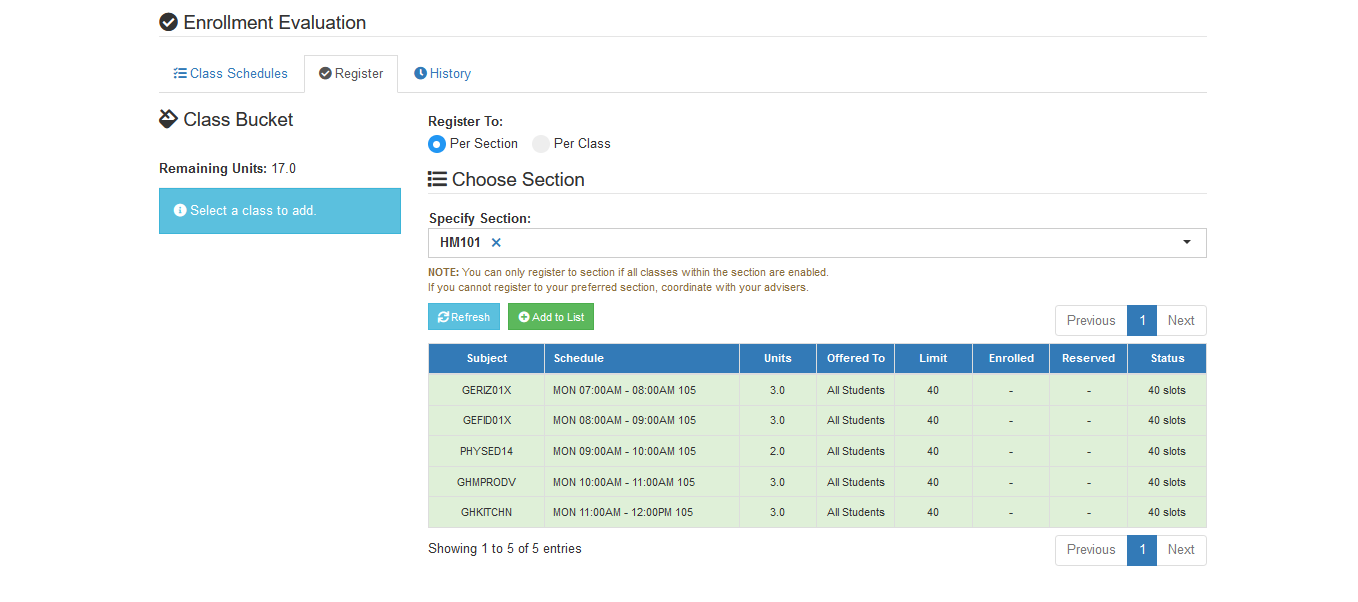
STEP 5. Click button to add all the classes in the Class Bucket.
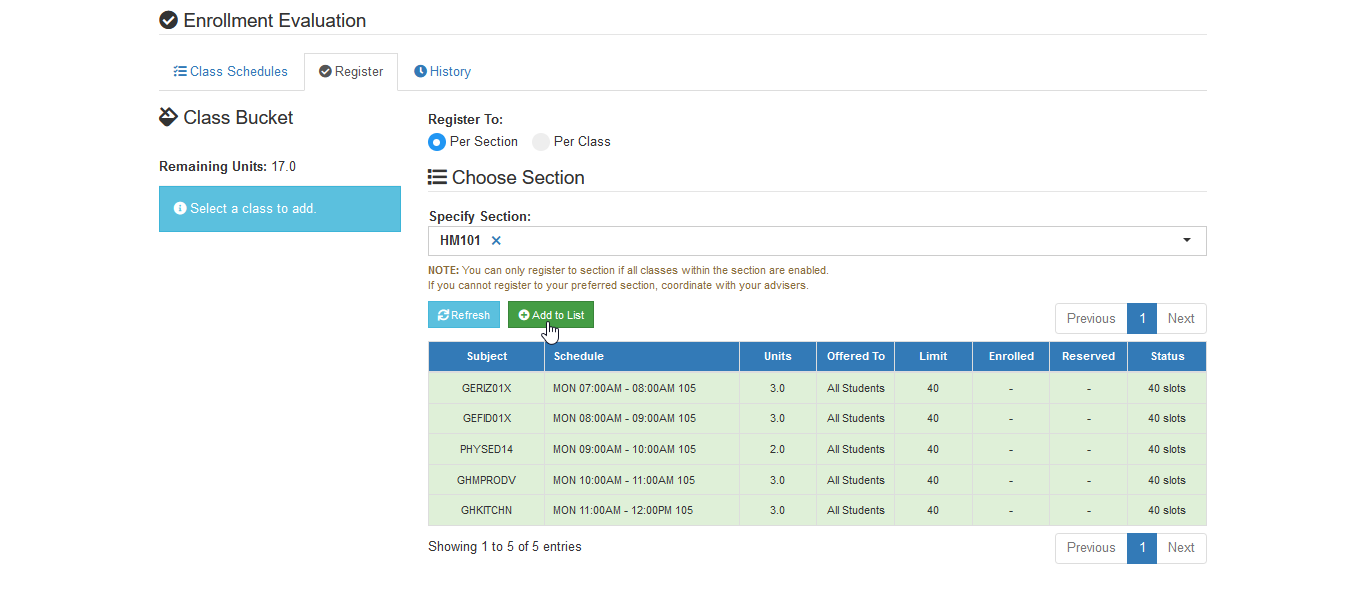
STEP 6. All preferred classes should be added as long as the remaining units suffice for the the total bucket. Click the button to review the selected classes.
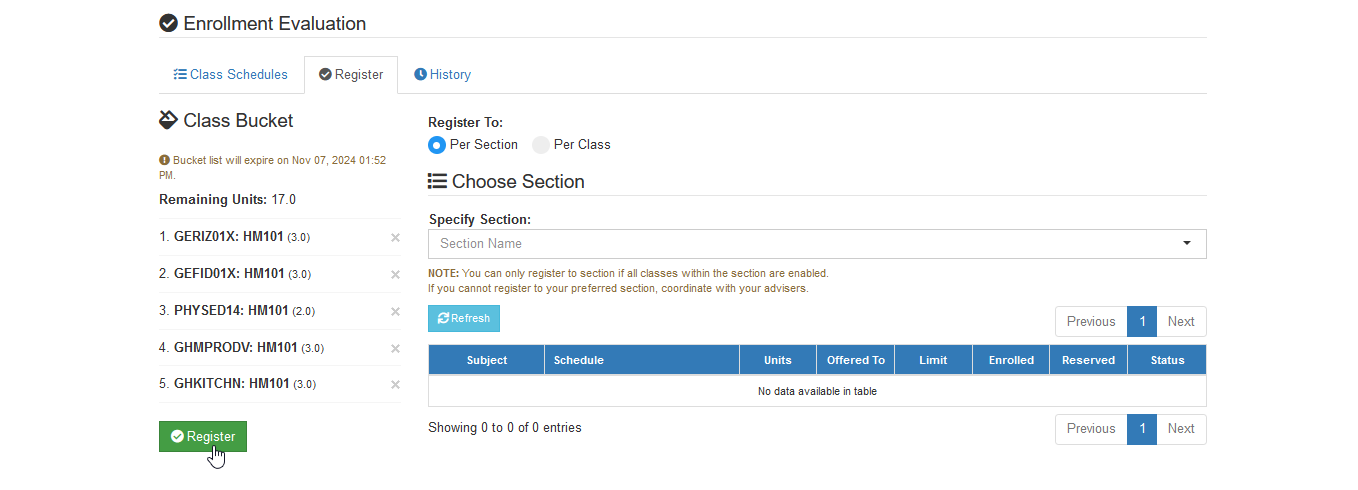
STEP 7. A prompt will appear. Confirm the registration by clicking the button.
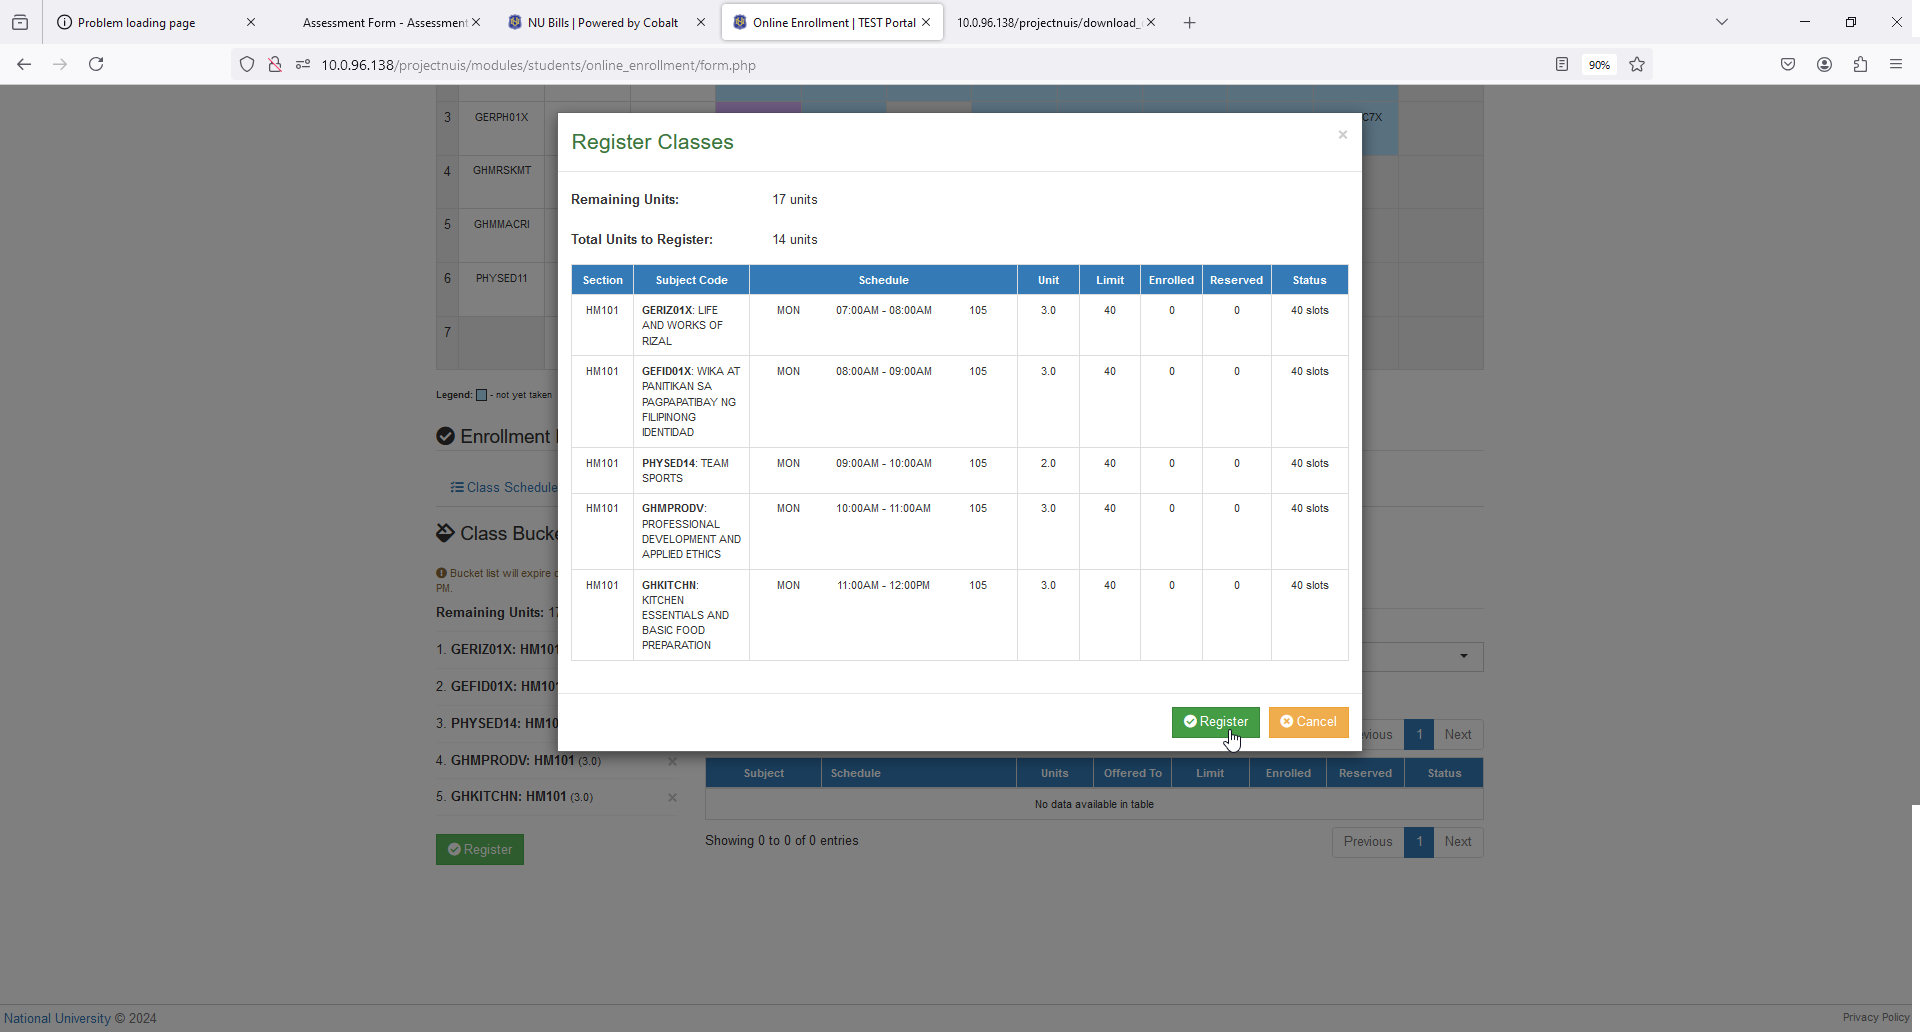
STEP 8. Review the list of registered classes. Once done, click the button and proceed to the enrollment.
Frequently Asked Questions
Refer to the School Academic Calendar for the schedule of Enrollment period. School’s term calendar is also available in your NUIS portal in Documents & Manuals > Academic Calendar module.
During Enrollment period, students are given the chance to finalize their class schedules for enrollment. They are still allowed to add or remove classes which had been pre-registered during Online Class Registration.
Submission of proof of payment can be disabled by the Treasury Office depending on their own discretion. To avoid pending enrollments, visit the Treasury Office for personal validation of your transactions.
If you are already enrolled and you want to revise your class schedules, coordinate with your Program Chair or Dean for Load Revision process.
Overloading units is subject to the Deans or Program Chairs approval. Coordinate with your Program Chair or Dean for modification of allowable units to take.
For more questions or concerns, email us at nuis@national-u.edu.ph